Tuesday, December 28, 2010

LotusScript Connectors for DB2


In my previous post I was explaining how to install the IBM Data Server Runtime Client, including some ODBC DB2 drivers to access a DB2 Database remotely. In this new post I explain the bare minimum to install in order to access a DB2 Data Source via LotusScript Extension for Lotus Connectors (LS LSX-LC).

By the way, the ODBC DataDirect Lotus-branded drivers might be available only to paying customers ...

A. Installing the DB2 ODBC CLI drivers

First you need to install the DB2 Client Drivers on the System (which are different from the those that come with the IBM Data Server Runtime Client). I am using a Windows server, so after download I just unzip either v9.7fp3a_nt32_odbc_cli.zip (23 bits) or v9.7fp3a_ntx64_odbc_cli.zip (64 bits) in a folder (e.g. C:\clidriver).

Then I open a command prompt and navigate to my folder (e.g. C:\clidriver\bin) and type:

     db2oreg1.exe -i -setup

Immediately following this you can set up the data sources in ODBC. Open Control Panel -> Administrative Tools -> Data Sources (ODBC).


You will see a screen that looks like the following, click on the "System DSN" tab:


Click "Add..." button to get the following, and select "IBM Data Server Driver for ODBC - C:/clidriver:


Enter a Data Source name, this is used directly in the Lotus Script( use the same name as the Database itself):


Enter the DB2 User ID and password that the agent uses to connect to DB2:


Select the "Save Password" option and click OK on the warning popup for saving the password in db2cli.ini file:


Click on the "Advanced Settings" tab:


Click "Add" and select the "Database" CLI Parameter:


Enter the Database name in the prompt and click OK:


Continue to do this for these parameters:
  • Database: The database name
  • Hostname: The DB2 server/host name (IP address is not recommended)
  • Port: 50000 (The default value for DB2 TCPIP accepting port)


B. Accessing the DB2 Database from LotusScript

1. Get access to the Lotus Connector Extensions (this is always installed)

      Option Public
      Option Explicit

      UseLSX "*lsxlc"

 2. Create the LCSession object at the top of all functions or subroutines

      Dim session As New LCSession

 3. Enable Connection pooling

      session.ConnectionPooling = true

 4. Create the Connection, using the LCConnection class's constructor that takes a single argument (the name of the connector type). We're using ODBC, which has the Lotus Connector name of "odbc2".
      Dim conn As New LCConnection ("odbc2")
      conn.Server = "RLS" 'Using the ODBC DATA SOURCE name created previously.
      conn.Connect

   5. When done with the connection, disconnect - This will not actually disconnect if connection pooling is enabled

      conn.Disconnect

Queries

Querying DB2 from a LCConnection object takes a couple of variables for holding the field names. There are multiple ways to issue a query:

LCConnection Execute

The execute command takes a full SQL statement, which is useful to capture complex queries. Unfortunately LSX LC (like LS:DO) does not support any kind of parameterized query syntax or method calls. This means that the parameter values sent to the database need to be encoded specifically for DB2. This kind of encoding may be difficult from LotusScript, and therefore it is recommended that for complex queries we use stored procedures in either SQL or Java. For simple select queries involving one table (or potentially view) and "ANDed" WHERE clause predicates, one can use the Select method against the LCConnection class.

Execute example code:
Dim fldLst As New LCFieldList
conn.Execute "SELECT * from TEST.CUSTOMER", fldLst ' fldLst is only used for result set purposes
Set fld = fldLst.Lookup ("CUST_NAME")
While (conn.Fetch(fldLst) > 0)
 Dim sName As string
 sName = fld.text(0) '' Do something with this column value
Wend

LCConnection Select

The Select command is best described in the LC LSX Manual, as there are many options. In the example code it shows the user accessing a "count" of returned records, this is not accurate for the DB2 and ODBC setup we are using. Instead, like the Execute method, the count can only be determined by the amount of times we loop in Fetching each row.

When using Select you must set the Metadata property to the schema and table name you're selecting from. Always use the form "schemaname.tablename" to avoid runtime errors later.

Select example code:
Dim result As New LCFieldList
conn.Metadata = "TEST.CUSTOMER" 
conn.Select Nothing, 1, result ' Is like SELECT * FROM TEST.CUSTOMER 
Set fld = result.Lookup ("CUST_NAME")
While (conn.Fetch(result) > 0)
 MessageBox fld.text(0) ' display the result
Wend
 
For more on LotusScript see the IBM documentation on Lotus Domino

I would also like to thank you my colleague Ravi L. for his walk through step by step on this topic!

Wednesday, November 24, 2010

Database Alias and DB2 ODBC Drivers

One of my recent project required to use ODBC to access DB2 databases located on remote VMWare LabManager images. I am using a Windows PC (Vista) laptop to develop and test my project (LotusScript Data Object code) - a Lotus Notes/Domino DB2 integration using ODBC. The first step for me was to install the ODBC DB2 drivers since I did not have DB2 installed on my laptop.

Several installations options were offered to me for DB2 9.7:
The installation of  the IBM Data Server Runtime Client is very fast and straightforward. It installs the ODBC/CLI drivers and a small set of useful command line setup tools:


After this, we can create the Database Aliases using the Windows ODBC Data Source Administrator.
When you look at the Drivers tab, you should now see your DB2 ODBC drivers

To add a DB2 Data Source Name (DSN):
  • select User or System and click on the Add... button.
  • select the DB2 ODBC/CLI driver
  • enter a Data source name and add an Alias if needed (click on the Add button next to your existing aliases if needed)
  • enter Data Source parameters (Description, user ID, password) - click "Save password" checkbox  to save your login and password locally in your db2cli.ini file.
  • enter your TCP/IP connection (port number is 50000 by default for me for DB2), the host name is the IP address of my DB2 server VMWare image.
  • I did not have to change anything in the defaults of Security options and Advanced Settings.


    From there you are ready to use your ODBC DSN ready to connect to your DB2 Database.

    One issue you will encounter though will be how to delete an existing Database Alias from the DB2 ODBC tab either to modify an existing one or to remove an old one.
    These appear in the drop down of the ODBC IBM DB2 Driver - Add popup window.


    The truth is that even though you are accessing a remote DB2 server machine, these aliases are stored locally on your DB2 installation.
    To remove the DB2 Database Aliases ODBC drivers, just start the IBM DB2 Command Line Processor and use the following command:

    UNCATALOG DATABASE <database_alias>


    In certain cases, you also need to refresh the directory cache. For this, just stop and restart the DB2 Management Service on your local Windows machine.

    Friday, October 29, 2010

    Healthcare REST APIs - JSON or XML?

    I have been working recently on a REST API which produces subsets of Continuity of Care Documents (CCD). This REST API is used by an iPhone application which is targeted to physicians and nurses. Since I wanted to minimize the amount of data exchange between the server and the client, I originally used JSON as my data exchange format. The motivation to use JSON was to have a compact format that offers better performance than a more complex XML representation.

    For example, the request to obtain lab-results from a CCD is as following:
    GET /users/<user-id>/patients/<patient-id>/lab-results?hl7v3=true&max=<max>offset=&<offset>
    

    The resulting of this request to the API is a JSON object containing a list of lab results:
    {"lab-results":{
        "list":[{"lab-result":{"entry":"...",
                               "facility":"...",
                               "normalcy":"...",
                               "orderedBy":"...",
                               "status":"...",
                               "subject":"...",
                               "urgency":"..."}},
                {"lab-result":{...}},...],
        "count":"...",
        "offset":"...",
        "remain":"..."}}
    

    A lab result HL7 V3 entry is returned as the following JSON object:
    {"entry":{
        "organizer":{
            "code":{"displayName":"..."}},
            "components":[
                {"component":{...}},
                {"component":{...}},...],
            "notes":[...]}}}
    

    A lab-result component itself:
    {"component":{
        "observation":{
            "code":{"displayName":"..."},
            "effectiveTime":{"value":""},
            "value":...,
            "interpretationCode":{"code":"..."},
            "referenceRange":{
                "observationRange":{...}},
            "notes":[...]}}}
    

    An observation value is returned as a JSON object containing either a string value, a unit and a type, or just some text.
    {"value":{"unit":"...","value":"...",type:"..."}}
    
    {"value":"..."}
    

    An observationRange is returned as a JSON value object containing a low and high value, or just some text.
    {"observationRange":{
        "value":{
            "low":{"value":"..."},
            "high":{"value":"..."}}}}
    
    {"observationRange":{"text":"..."}
    

    All these JSON objects are marshalled from annotated Java POJOs using JBOSS RestEasy framework and Jackson:
    XmlRootElement(name = "high")
    public class HighValue {
    
     private String value = "";
    
     /**
      * Construct a new instance.
      */
     public HighValue() { }    // Empty constructor
    
     /**
      * Create a new {@code HighValue} during JAXB unmarshalling.
      * @param value
      *            String as value for the high value.
      */
     public HighValue(final String value) {
      if (value != null)
       this.value = value.trim();
     }
    
     /**
      * Get the {@code value} attribute.
      * @return {@code value} attribute value (may be {@code null}).
      */
     @XmlElement
     public String getValue() {
      return value;
     }
    
     /**
      * Set the {@code value} attribute.
      * @param value
      *            value to set.
      * @see #getValue()
      */
     public void setValue(final String value) {
      if (value != null)
       this.value = value.trim();
     }
    }
    
    This was fine initially since I was focusing on just lab results and I was using a specific back-end API that providing values to populate my POJOs. This solution started to become more complex when I was asked to generated a large set of CCD data types. As a result, the number of Java objects became quickly larger.

    The other option I had was to use another internal API I could use which was already generated full or subset of CCD. However the resulting CCD format provided was in XML:
    <component>
      <observation classCode="OBS" moodCode="EVN">
        <templateId root="2.16.840.1.113883.10.20.1.31"/>
        <templateId root="1.3.6.1.4.1.19376.1.5.3.1.4.13"/>
        <templateId root="2.16.840.1.113883.3.88.11.83.15"/>
        <id root="1"/>
          <code code="Remark" codeSystemName="L" displayName="Remark"/>
          <text>
            <reference value="#Observation_504ccbaf5ecea7b1096720"/>
          </text>
          <statusCode code="completed"/>
          <effectiveTime value="20091223231100"/>
            <value xsi:type="ST">Spec #106641063: 23 Dec 09  2311</value>
          <interpretationCode code="N" codeSystem="2.16.840.1.113883.5.83" codeSystemName="ObservationInterpretation" displayName="Normal"/>
      </observation>
    </component>
    

    I could of course just used it as it is and have my REST API return XML CCD subsets in XML:
    GET /users/<user-id>/patients/<patient-id>/CCD&section=<section>
    

    They are several issues with this:
    • As you can see XML is much more complex to understand, parse and debug than JSON
    • XML increases bandwidth consumption
    • Browsers and client application (e.g. mobile devices) can consume JSON much more efficiently than XML
    For me, the best solution was to have the internal API marshalling the CCD in both XML and JSON so I will not have to unmarshall the CCDs again into POJOS.

    The good news for all of us is that you can use java tools such as JAXB which has adapters to support other formats than XML such as JSON. With Java annotations, this is very easy to implement.

    Friday, September 10, 2010

    Spring Dependency Injection with JBOSS : the CLASSPATH issue

    When facing the problem of deploying web archives (war) to be configured through Spring dependency injection, you probably want to have generic applications that do not have to be recompile every time you deploy them on new configurations.

    In my current project I need to configure a REST API with various parameters (host name, database paths, maximum of records per request). For this I use Spring dependency injection where the parameters are injected at run-time via a resource file located outside the war file, in a folder specified by the Windows CLASSPATH variable (my testing and production platforms are windows machine).

    First I need to add a windows CLASSPATH system variable (in your system properties/environment variables)  if this variable does not exist. Then I add the resources.xml file directly in the folder specified by CLASSPATH. You can also use a sub-folder but you will need to hard-code the name of the folder in your spring config file - in my case applicationContext.xml located in ./src/main/webapp/WEB-INF/

    <beans xmlns="http://www.springframework.org/schema/beans"
     xmlns:xsi="http://www.w3.org/2001/XMLSchema-instance" 
     xmlns:context="http://www.springframework.org/schema/context"
     xsi:schemaLocation="
            http://www.springframework.org/schema/context 
            http://www.springframework.org/schema/context/spring-context-2.5.xsd
            http://www.springframework.org/schema/beans 
            http://www.springframework.org/schema/beans/spring-beans.xsd">
        <import resource="classpath:/resources.xml" />
    </beans>
    

    My resources.xml looks like this:

    <beans xmlns="http://www.springframework.org/schema/beans"
     xmlns:xsi="http://www.w3.org/2001/XMLSchema-instance" 
     xmlns:context="http://www.springframework.org/schema/context"
     xsi:schemaLocation="
            http://www.springframework.org/schema/context 
            http://www.springframework.org/schema/context/spring-context-3.0.xsd
            http://www.springframework.org/schema/beans 
            http://www.springframework.org/schema/beans/spring-beans-3.0.xsd">
      <bean id="custService" 
                          scope="prototype"
                          class=".....">
       <property name="hostName" value="121.122.123.124"/>
       <property name="databasePath" value="..."/>
       <property name="maxRecordsPerRequest" value="1000"/>
      </bean>
    </beans>
    

    One issue you might encounter when you try to deploy your application on JBoss is that the web application server does not take into account the CLASSPATH out-of-the-box (I am using redhat EAP 5.0.X - production setting), but this might be also the case with JBOSS community edition.

    Your war file will probably fail to deploy and you will find a bunch of errors in your log file ./jboss-as/server/<setting>/log/server.log  including:

    org.springframework.beans.factory.parsing.BeanDefinitionParsingException: Configuration problem: 
    Failed to import bean definitions from URL location [classpath:/resources.xml]
    Offending resource: ServletContext resource [/WEB-INF/applicationContext.xml]; nested exception is org.springframework.beans.factory.BeanDefinitionStoreException:
    IOException parsing XML document from class path resource [resources.xml]; 
    nested exception is java.io.FileNotFoundException: 
    class path resource [resources.xml] cannot be opened because it does not exist
    

    What is missing is that you need to tell JBoss about your CLASSPATH variable.
    Just edit ./jboss-as/bin/run.bat and add the CLASSPATH variable and you will be up and running in no time.

    :RESTART
    "%JAVA%" %JAVA_OPTS% ^
       -Djava.endorsed.dirs="%JBOSS_ENDORSED_DIRS%" ^
       -classpath "%JBOSS_CLASSPATH%;%CLASSPATH%" ^
       org.jboss.Main -b 0.0.0.0 -c production %*
    

    Tuesday, August 24, 2010

    RESTeasy JAX-RS embeddable server and SpringBeanProcessor

    TJWS (Tiny Java Web Server and Servlet Container) is a very convenient miniature Java Web Server build as a servlet container with HTTPD servlet providing standard Web server functionality.

    I have been using TJWS for testing a REST API to be deployed on JBoss application server. The advantage is that JUnit tests can run without the need to deploy a war file on JBoss. Since I have implemented the REST API with RESTEasy, I am using the embedded TJWS server part of the org.jboss.resteasy.plugins.server.tjws.TJWSEmbeddedJaxrsServer package.

    The RESTEasy documentation (chapter 23) describes how to use the embedded container.

    @Path("/")public class MyResource {
    
       @GET
       public String get() { return "hello world"; }
     
       public static void main(String[] args) throws Exception 
       {
          TJWSEmbeddedJaxrsServer tjws = new TJWSEmbeddedJaxrsServer();
          tjws.setPort(8081);
          tjws.getRegistry().addPerRequestResource(MyResource.class);
          tjws.start();
       }
    }

    As you can see, TJWS is very simple to use. You create an instance of the server, setup the port (this is very useful when for example certain ports are already used - I had to set a specific port for our Hudson continuous builds). Then you specify the class to test and you start the server.

    In my JUnit tests, I start the server before each tests and stop it after the tests are completed:

    private TJWSEmbeddedJaxrsServer server; 
    
    @Before
        public void start() {
          
         server = new TJWSEmbeddedJaxrsServer();
         server.setPort(SERVER_PORT);
         server.getDeployment().getActualResourceClasses().add(MyResource.class);
         server.start();
        }
    
    @After
        public void stop() {
         server.stop();
        }

    Since I am using Spring I was interested to leverage the framework for dependency injection in order to configure certain server settings. However the RESTeasy documentation provides only some pseudo-code example:

    public static void main(String[] args) throws Exception 
       {
          final TJWSEmbeddedJaxrsServer tjws = new TJWSEmbeddedJaxrsServer();
          tjws.setPort(8081);
    
          org.resteasy.plugins.server.servlet.SpringBeanProcessor processor = new SpringBeanProcessor(tjws.getRegistry(), tjws.getFactory();
          ConfigurableBeanFactory factory = new XmlBeanFactory(...);
          factory.addBeanPostProcessor(processor);
    
          tjws.start();
       }
    

    I had to make some modifications to the code provided as follow:

    @Before
        public void start() {
          
         server = new TJWSEmbeddedJaxrsServer();
         server.setPort(SERVER_PORT);
         server.getDeployment().getActualResourceClasses().add(MyResource.class);
         server.start();
         
         Resource resource = new FileSystemResource("src/test/resources/resources.xml");
         ConfigurableListableBeanFactory factory = new XmlBeanFactory(resource);
         SpringBeanProcessor processor = new SpringBeanProcessor(
                 server.getDeployment().getDispatcher(),
                 server.getDeployment().getRegistry(), 
                 server.getDeployment().getProviderFactory());
         processor.postProcessBeanFactory(factory);
        }
    

    Alternatively you can define your Spring resource file in a static string directly in your JUnit test class:

    Resource resource = new ByteArrayResource(SPRING_BEAN_CONFIG_FILE.getBytes());

    Wednesday, July 28, 2010

    How to secure the JBoss JMX and Web Consoles?

    Lately I have been using JBoss more and more as my deployment platform of choice. I am currently using the latest JBoss Enterprise Middleware solution (EAP version 5.0.1). This is a commercial version, but you can also use the community edition as well which offers most of the same features.

    One of the issue I have encountered recently was how to secure the web based administration consoles?

    As a matter of fact, the default installation offers a login and password for the admin console which is typically accessible on http://localhost:8080/admin-console if your web application runs locally, or more generally on http://<host>:<port>/admin-console.
    However if you want to protect the JMX console (http://localhost:8080/jmx-console) and the JBoss Web console (http://localhost:8080/web-console) you have to make sure that certain files in your installation are setup correctly.


    Generally, the JBoss community and RedHat are quite good at documenting the features of their products, but I was disappointed to find incomplete information in the main page on this subject.

    This page explains that "the jmx-console and web-console are standard servlet 2.3 deployments that can
    be secured using J2EE role based security.  Both also have a skeleton setup to allow one to easily enable security using username/password/role mappings found in the jmx-console.war and web-console.war deployments in the corresponding WEB-INF/classes users.properties and roles.properties files".

    Until this point, it is quite clear. The difficulty starts with a vague description where to find the files in questions :

    To secure the JMX Console using a username/password file -
    • Locate the  directory.  This will normally be in  directory..
    The author probably assumes that the various locations are obvious to everyone. Let me be more precise and generous in details:


    First you will need to know which profile/configuration you are running. JBoss EAP has six configurations based on your needs:
    • all (everything, including clustering support and other enterprise extensions)
    • default (for application developers)
    • minimal (the strict minimum)
    • production (everything but optimized for production environments)
    • standard (tested for Java EE compliance)
    • web (experimental lightweight configuration) 

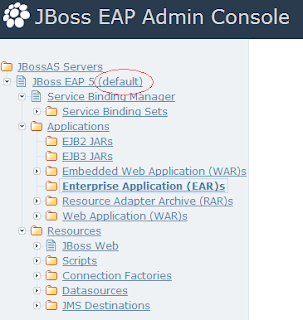
      If you did not specify your profile explicitly at starting time (run.sh -c )you most likely use the default profile.


      You can check which profile is running by looking at your JBoss EAP Admin Console. The name of the profile/configuration is indicated at the top of the server hierarchy.

      By the way, the various applications that you will likely developed (war, ear, rar or jar files) will be deployed under the corresponding folders under the Applications node.

      First you might want to change the login and password of the admin console itself before adding those for the JMX and Web consoles?


      One important "meta" file is login-config.xml which is located under \jboss-as\server\ 


      This file specify for a specific profile (e.g. default) the security-domain values for the consoles:

      <application-policy name = "jmx-console">
          <authentication>
            <login-module code="org.jboss.security.auth.spi.UsersRolesLoginModule"
              flag="required">
              <module-option name="usersProperties">props/jmx-console-users.properties</module-option>
              <module-option name="rolesProperties">props/jmx-console-roles.properties</module-option>
            </login-module>
          </authentication>
        </application-policy> 

      <application-policy name = "web-console">
          <authentication>
            <login-module code="org.jboss.security.auth.spi.UsersRolesLoginModule"
              flag="required">
              <module-option name="usersProperties">web-console-users.properties</module-option>
              <module-option name="rolesProperties">web-console-roles.properties</module-option>
            </login-module>
          </authentication>
        </application-policy>

      In other words, this file can help you locate and map how authentication (login and password in users.properties file) and authorization (access control in roles.properties file) is specified.

      Since these consoles are themselves web applications, you will need to look at exploded war files under your profile, under the deploy folder.

      Securing the JMX Console:

      • Locate the folder jmx-console.war under ./server/<config>/deploy
      • Open the file ./server/<config>/deploy/mx-console.war/WEB-INF/web.xml
      • Verify that the <security-constraint> section is not commented (in this section, you should see specified  the roles for authorization (see below)
      <security-constraint>
           <web-resource-collection>
             <web-resource-name>HtmlAdaptor</web-resource-name>
             <description>An example security config that only allows users with the
               role JBossAdmin to access the HTML JMX console web application
             </description>
             <url-pattern>/*</url-pattern>
           </web-resource-collection>
           <auth-constraint>
             <role-name>JBossAdmin</role-name>
           </auth-constraint>
         </security-constraint>
      • Locate the file: .\server\<config>\conf\props\jmx-console-users.properties (if the file name has not been changed in login-config.xml
      • change admin=admin to your new <new_login>=<new_password>
      The authentication method is specified in the following section:
       <login-config>
            <auth-method>BASIC</auth-method>
            <realm-name>JBoss JMX Console</realm-name>
         </login-config>
      
         <security-role>
            <role-name>JBossAdmin</role-name>
         </security-role>

      Securing the Web Console:
      • Login credentials are the same as used for the JMX console - in : .\server\<config>\conf\props\jmx-console-users.properties 
      • change admin=admin to your new <new_login>=<new_password> 

      For more information and this topic you can also look at Securing the JMX Console and Web Console (HTTP).

      Thursday, June 10, 2010

      Response objects and the use of GenericEntity class with RESTEasy

      Recently during the implementation of a REST API, I wanted to return a complex response containing a list of objects (Patients). The issue was that the RESTEasy build-in JAXB MessageBodyWriter could not directly handle lists of JAXB objects (Java has trouble obtaining generic type information at runtime).

      I was recently in a situation where I had to create a complex response to a HTTP POST for my REST API. I am using JAXB /JSON support from RESTEasy.

      I found some element of answer in the book "RESTFul Java with JAX-RS" from Bill Burke (pp 102). However the code snippet had a couple of errors:

        • the GenericEntity object cannot be passed to the Response.ok() method directly (a ResponseBuilder is required).

        • references to GenericEntity needs to be parameterized.

      My use case is a little more complex than in the book. I am receiving a user-name and password from a POST (e.g. a form submit). I then perform the authentication and returns a list of Patient objects in a JSON/GZIP compressed format (instead a list of Customer objects) together with an authentication token.


      The resulting code looks like this:

      
         @POST
         @Path("/token")
         @Consumes("application/x-www-form-urlencoded")
         @Produces("application/json")
         @GZIP
         public Response getPatientsWithToken(@FormParam("username") String username, @FormParam("password") String password) {
        
              Login login = new Login(username, password);
              // ... perform authentication here ....
          
              // Build the returning patient list
              List<Patient> returnList = new ArrayList<Patient>();
              returnList.addAll(patients.values());
              Collections.sort(returnList);
            
              GenericEntity<List<Patient>> entity = new GenericEntity<List<Patient>>(returnList){};
            
              // Create the response
              ResponseBuilder builder = Response.ok(entity);
              return builder.build();
         }


      Of course you will have to import the following classes as well:


      import javax.ws.rs.core.GenericEntity;
      import javax.ws.rs.core.Response;
      import javax.ws.rs.core.Response.ResponseBuilder;
      

      Wednesday, June 9, 2010

      Open APIs: State of the Market, May 2010

      Today, I was looking at the presentation from John Musser related to Open APIs (see below). Even though these statistics comes mainly from mashup and consumer applications, I was surprised by the fact that REST APIs are gaining market shares over SOAP APIs so rapidly.

      In B2B and in the enterprise world in general SOAP is often the top choice. The advantages for SOAP often mentioned are:
      • Type checking (via the WSDL files)
      • Availability of development tools
      On the other hand, REST offers the following:
      • Lightweight and easy to build
      • Human Readable Results
      • Extensibility
      • Scalability

      In Health Care, SOAP is still widespread and prevalent. However there are some interesting projects such as NHIN Direct Health Information Exchange where the relevance of REST vs other API protocols are discussed.

      It will be interesting to see what will be the outcome of such discussions.

      Tuesday, June 1, 2010

      JAXB-JSON Rest API using RESTEasy on JBoss EAP

      In this second part of my evaluation of JBoss RESTEasy, I focus on adapting the JAXB-JSON samples provided by RESTEasy for JBoss Enterprise Application Platform 5.0.1.

      Earlier I find myself to adapt the maven POM file to have the proper dependencies for the Twitter RESTEasy client.

      Initially this simple JAXB-JSON sample had been designed to run on Jetty Web Server which run fine out-of-the box. However I had to make some modifications to the original project structure to have the code running as a simple eclipse project that can be deploy on JBoss EAP 5.0.X from RedHat (this will also work on Jboss community edition).

      The new project (eclipse) structure looks as below:


      Notice that I have also moved the code for both packages:  org.jboss.resteasy.annotations.providers.jaxb.json
      org.jboss.resteasy.plugins.providers.jaxb.json
      at the root of my project, since I am not using the remaining code of the example.

      I also made some additional adaptations for JBoss to some of the project files including:
      • pom.xml file
      • web.xml
      I also added a small test suite to test the REST API operations using JUnit which will work after the first deployment (I run JBoss locally on http://localhost:8080).

      By the way, make sure you have src/main/resources/META-INF/services/javax.ws.rs.ext.Providers included in your project.


      Here is the content of my new pom.xml file for JBoss:

      <?xml version="1.0" encoding="UTF-8"?>
      <project xmlns="http://maven.apache.org/POM/4.0.0"
               xmlns:xsi="http://www.w3.org/2001/XMLSchema-instance"
               xsi:schemaLocation="http://maven.apache.org/POM/4.0.0 http://maven.apache.org/maven-v4_0_0.xsd">
          <modelVersion>4.0.0</modelVersion>
          <groupId>org.jboss.resteasy.examples</groupId>
          <artifactId>jaxb-json</artifactId>
          <version>0.1.0</version>
          <packaging>war</packaging>
          <name/>
          <description/>
      
          <repositories>
              <repository>
                  <id>java.net</id>
                  <url>http://download.java.net/maven/1</url>
                  <layout>legacy</layout>
              </repository>
              <repository>
                  <id>maven repo</id>
                  <name>maven repo</name>
                  <url>http://repo1.maven.org/maven2/</url>
              </repository>
              <!-- For resteasy -->
              <repository>
                  <id>jboss</id>
                  <name>jboss repo</name>
                  <url>http://repository.jboss.org/maven2</url>
              </repository>
          </repositories>
          <dependencies>
          
              <!-- core library -->
              
              <dependency>
                  <groupId>org.jboss.resteasy</groupId>
                  <artifactId>resteasy-jaxrs</artifactId>
                  <version>1.2.1.GA</version>
                  <!-- filter out unwanted jars -->
                  <exclusions>
                      <exclusion>
                          <groupId>commons-httpclient</groupId>
                          <artifactId>commons-httpclient</artifactId>
                      </exclusion>
                      <exclusion>
                          <groupId>tjws</groupId>
                          <artifactId>webserver</artifactId>
                      </exclusion>
                      <exclusion>
                          <groupId>javax.servlet</groupId>
                          <artifactId>servlet-api</artifactId>
                      </exclusion>
                  </exclusions>
              </dependency>
              
              <!-- optional modules -->
              
            <dependency>
                  <groupId>org.jboss.resteasy</groupId>
                  <artifactId>resteasy-jettison-provider</artifactId>
                  <version>1.2.1.GA</version>
              </dependency>
              
              <!-- modules already provided by Java 6.0 -->
               
         <dependency>
             <groupId>javax.xml.bind</groupId>  
             <artifactId>jaxb-api</artifactId>
             <version>2.1</version>
             <scope>provided</scope>
         </dependency>
         
          <dependency>
               <groupId>junit</groupId>
                <artifactId>junit</artifactId>
                <version>4.1</version>
                       <scope>test</scope>
                   </dependency>
           
          </dependencies>
      
          <build>
              <finalName>jaxb-json</finalName>
              <plugins>
                  <plugin>
                      <groupId>org.codehaus.mojo</groupId>
                      <artifactId>jboss-maven-plugin</artifactId>
                      <version>1.4</version>
                      <configuration>
                          <jbossHome>C:\JBoss\EnterprisePlatform-5.0.0.GA\jboss-as</jbossHome>
                   <contextPath>/</contextPath>
                   <serverName>default</serverName>
                   <fileName>target/jaxb-json.war</fileName>
                </configuration>
                  </plugin>
                  <plugin>
                      <groupId>org.apache.maven.plugins</groupId>
                      <artifactId>maven-compiler-plugin</artifactId>
                      <configuration>
                          <source>1.5</source>
                          <target>1.5</target>
                      </configuration>
                  </plugin>
              </plugins>
          </build>
      </project>


      I modified the web.xml for the URL looks more simple by removing the mapping to reasteasy:

      <?xml version="1.0"?>
      <!DOCTYPE web-app PUBLIC "-//Sun Microsystems, Inc.//DTD Web Application 2.3//EN"
              "http://java.sun.com/dtd/web-app_2_3.dtd">
      
      <web-app>
         <display-name>Archetype Created Web Application</display-name>
      
         <context-param>
            <param-name>javax.ws.rs.Application</param-name>
            <param-value>org.jboss.resteasy.examples.service.LibraryApplication</param-value>
         </context-param>
      
         <context-param>
            <param-name>resteasy.servlet.mapping.prefix</param-name>
            <param-value>/</param-value>
         </context-param>
      
         <listener>
            <listener-class>
               org.jboss.resteasy.plugins.server.servlet.ResteasyBootstrap
            </listener-class>
         </listener>
      
         <servlet>
            <servlet-name>Resteasy</servlet-name>
            <servlet-class>
               org.jboss.resteasy.plugins.server.servlet.HttpServletDispatcher
            </servlet-class>
         </servlet>
      
         <servlet-mapping>
            <servlet-name>Resteasy</servlet-name>
            <url-pattern>/</url-pattern>
         </servlet-mapping>
      
      </web-app>
      

      The JUnit code looks like this:

      package org.jboss.resteasy.examples.test;
       
      import java.io.BufferedReader;
      import java.io.InputStreamReader;
      import java.net.HttpURLConnection;
      import java.net.URL;
      
      import junit.framework.Assert;
      import junit.framework.Test;
      import junit.framework.TestCase;
      import junit.framework.TestSuite;
        
      public class LibraryTest extends TestCase
      {
          /**
           * Create the test case
           *
           * @param testName name of the test case
           */
          public LibraryTest( String testName )
          {
              super( testName );
          }
      
          /**
           * @return the suite of tests being tested
           */
          public static Test suite()
          {
              return new TestSuite( LibraryTest.class );
          }
      
            
          /**
           * Testing the Library REST API
           */
          
          public void testGetMapped()  
          {
           validateRESTCall("GET", "http://localhost:8080/jaxb-json/library/books/mapped");
           assertTrue( true );
          }
          
      
          public void testGetBadger()  
          {
           validateRESTCall("GET", "http://localhost:8080/jaxb-json/library/books/badger");
           assertTrue( true );
          }
          
          private void validateRESTCall(String method, String url) {
           
           try {
               System.out.println("*** "+method);
               URL resURL = new URL(url);
               System.out.println("URL: " + url.toString());
               HttpURLConnection connection = (HttpURLConnection) resURL.openConnection(); 
               connection.setRequestMethod(method);
               System.out.println("Content-Type: " + connection.getContentType());
               
               BufferedReader reader = new BufferedReader(new InputStreamReader(connection.getInputStream()));
       
               String line = reader.readLine();
               while (line != null)
               {
                  System.out.println(line);
                  line = reader.readLine();
               }
               Assert.assertEquals(HttpURLConnection.HTTP_OK, connection.getResponseCode());
               connection.disconnect();
           } catch (Exception err) { 
               System.out.print("Error in VHRResourceTest.validateRESTCall : " + err); 
              };
          }
      }
      

      To build I am using Maven (I recommend to install the maven eclipse plugin) with the goals mvn clean install compile package. Make sure also that before that you do a mvn eclipse:eclipse to update the dependencies in your project.

      To deploy jaxb-json.war file from eclipse (so I don't have to manually copy the war file from the target folder), I have installed the JBoss eclipse plugin. As a result I can make it deployable (accessible by a right-click) and it appear in the Eclipse JBoss server view:


      The REST API JSON Library resources are then accessible directly on a browser via http://localhost:8080/jaxb-json/library/books/mapped or http://localhost:8080/jaxb-json/library/books/badger.

      If you want to compress your response, RESTEasy provides GZIP Compression/Decompression support using a very simple @GZIP annotation:

         @GET
         @Path("books/mapped")
         @Produces("application/json")
         @GZIP
         public BookListing getBooksMapped()
         {
            return getListing();
         }

      Just import the following class:

      import org.jboss.resteasy.annotations.GZIP;

      Overall the adaptation from Jetty to JBoss was easy and the documentation very clear.

      Additional discussions, recommendations and information can be found on the JBoss Community.

      For an example of using REST architecture for Mobile Applications (HealthCare) see this post.

      Tuesday, May 18, 2010

      Enhanced POM for JBoss RESTEasy Twitter API Client Sample

      I recently looked at JBOSS RESTEasy as a way to create and test RESTful APIs. The platform looks very promising with a lot of praise from developers. Also the documentation seems very extensive and precise.

      I started by downloading RESTEasy 1.2.1 GA and tried the sample code. I started with a java client to access existing RESTful Web Services and APIs. Among the api-clients, there is a Twitter small client that works out-of-the box (located under /RESTEASY_1_2_1_GA/examples/api-clients/src/main/java/org/jboss/resteasy/examples/twitter).

      However when I started to extract the code and wanted to create a Maven 2 based stand-alone project, I encountered some issues related to JAR dependency conflicts, including the following error message also described here.

      java.lang.NoClassDefFoundError: Could not initialize class com.sun.xml.bind.v2.model.impl.RuntimeBuiltinLeafInfoImpl 
      

      The project (eclipse) structure looks as below:


      I managed to fix these issues by modifying the POM file as follow:

      <?xml version="1.0" encoding="UTF-8"?>
          <project xmlns="http://maven.apache.org/POM/4.0.0" xmlns:xsi="http://www.w3.org/2001/XMLSchema-instance"
          xsi:schemaLocation="http://maven.apache.org/POM/4.0.0 http://maven.apache.org/maven-v4_0_0.xsd">
          <modelVersion>4.0.0</modelVersion>
       
          <groupId>org.jboss.resteasy.examples</groupId>
       <artifactId>api-clients</artifactId>
       <version>1.2.1.GA</version>
        
        <dependencies>
          <!-- Resteasy Core -->
          <dependency>
            <groupId>org.jboss.resteasy</groupId>
            <artifactId>resteasy-jaxrs</artifactId>
          </dependency>
          <!-- JAXB support -->
         <dependency>
            <groupId>org.jboss.resteasy</groupId>
            <artifactId>resteasy-jaxb-provider</artifactId>
         </dependency>
          
        </dependencies>
        <dependencyManagement>
              <dependencies>
                  <dependency>
                      <groupId>org.jboss.resteasy</groupId>
                      <artifactId>resteasy-bom</artifactId>
                      <version>1.2.1.GA</version>
                      <type>pom</type>
                      <scope>import</scope>
                  </dependency>
              </dependencies>
         </dependencyManagement>
         
         <!-- Build Settings --> 
         <build>
          <plugins>  
            <plugin>
              <artifactId>maven-compiler-plugin</artifactId>
              <configuration>
                <source>1.6</source>
                <target>1.6</target>
              </configuration>
            </plugin>
          </plugins>
         </build>
        
        <!-- Environment Settings -->
        <repositories>
          <repository>
            <id>jboss</id>
            <name>jboss repo</name>
            <url>http://repository.jboss.org/maven2</url>
           </repository>
         </repositories>
        
      </project>
      

      The most important piece, beside the cleaning of the POM file, was to include a pom that can be imported so the versions of the individual modules do not have to be specified (see RESTEasy documentation - Chapter 43. Maven and RESTEasy).

      I also made sure to have correct dependencies for resteasy-jaxrs and resteasy-jaxb-provider.

      As a result, I was able to compile the whole project without any errors (mvn clean compile) and run it to access the Twitter REST API

      mvn exec:java -Dexec.mainClass="org.jboss.resteasy.examples.twitter.TwitterClient" -Dexec.args="<userid> <password>"
      (Replace last parameters by your twitter user and password).

      The small client in question leverages JAX-RS annotations to read and write the Twitter API resources:

      package org.jboss.resteasy.examples.twitter;
      
      import java.util.Date;
      import java.util.List;
      
      import javax.ws.rs.FormParam;
      import javax.ws.rs.GET;
      import javax.ws.rs.POST;
      import javax.ws.rs.Path;
      import javax.xml.bind.annotation.XmlElement;
      import javax.xml.bind.annotation.XmlRootElement;
      import javax.xml.bind.annotation.adapters.XmlJavaTypeAdapter;
      
      import org.apache.commons.httpclient.Credentials;
      import org.apache.commons.httpclient.HttpClient;
      import org.apache.commons.httpclient.UsernamePasswordCredentials;
      import org.apache.commons.httpclient.auth.AuthScope;
      import org.jboss.resteasy.client.ProxyFactory;
      import org.jboss.resteasy.client.ClientExecutor;
      import org.jboss.resteasy.client.core.executors.ApacheHttpClientExecutor;
      import org.jboss.resteasy.plugins.providers.RegisterBuiltin;
      import org.jboss.resteasy.spi.ResteasyProviderFactory;
      
      public class TwitterClient
      {
         static final String friendTimeline = "http://twitter.com/statuses/friends_timeline.xml";
      
         public static void main(String[] args) throws Exception
         {
            RegisterBuiltin.register(ResteasyProviderFactory.getInstance());
            final ClientExecutor clientExecutor = new ApacheHttpClientExecutor(createClient(args[0], args[1]));
            TwitterResource twitter = ProxyFactory.create(TwitterResource.class,
                  "http://twitter.com", clientExecutor);
            System.out.println("===> first run");
            printStatuses(twitter.getFriendsTimelines());
            
            twitter
            .updateStatus("I programmatically tweeted with the RESTEasy Client at "
                  + new Date());
            
            System.out.println("===> second run");
            printStatuses(twitter.getFriendsTimelines());
         }
      
         public static interface TwitterResource
         {
            @Path("/statuses/friends_timeline.xml")
            @GET
            Statuses getFriendsTimelines();
      
            @Path("/statuses/update.xml")
            @POST
            Status updateStatus(@FormParam("status") String status);
         }
      
         private static void printStatuses(Statuses statuses)
         {
            for (Status status : statuses.status)
               System.out.println(status);
         }
      
         private static HttpClient createClient(String userId, String password)
         {
            Credentials credentials = new UsernamePasswordCredentials(userId,
                  password);
            HttpClient httpClient = new HttpClient();
            httpClient.getState().setCredentials(AuthScope.ANY, credentials);
            httpClient.getParams().setAuthenticationPreemptive(true);
            return httpClient;
         }
      
         @XmlRootElement
         public static class Statuses
         {
            public List<Status> status;
         }
      
         @XmlRootElement
         public static class Status
         {
            public String text;
            public User user;
      
            @XmlElement(name = "created_at")
            @XmlJavaTypeAdapter(value = DateAdapter.class)
            public Date created;
      
            public String toString()
            {
               return String.format("== %s: %s (%s)", user.name, text, created);
            }
         }
      
         public static class User
         {
            public String name;
         }
      
      }


      The small DateAdapter class is a utility class for date formatting:

      package org.jboss.resteasy.examples.twitter;
      
      import java.util.Date;
      import java.util.List;
      package org.jboss.resteasy.examples.twitter;
       
      import java.util.Date;
      import javax.xml.bind.annotation.adapters.XmlAdapter;
      import org.jboss.resteasy.util.DateUtil;
      
      public class DateAdapter extends XmlAdapter<String, Date> {
      
         @Override
         public String marshal(Date date) throws Exception {
             return DateUtil.formatDate(date, "EEE MMM dd HH:mm:ss Z yyyy");
         }
      
         @Override
         public Date unmarshal(String string) throws Exception {
             try {
                 return DateUtil.parseDate(string);
             } catch (IllegalArgumentException e) {
                 System.err.println(String.format(
                         "Could not parse date string '%s'", string));
                 return null;
             }
         }
      }
      

      Friday, April 16, 2010

      SOA and Health Care Meaningful Use requirements of the Recovery Act


      The Interim Final Rule of the Health Information Technology for Economic and Clinical Health (HITECH) Act was passed by Congress in February of 2009.  Under this act, eligible providers will be given financial rewards if they demonstrate "meaningful use" of "certified" Electronic Health Record (EHR) technologies.

      Therefore there is a big incentive for health care vendors to offer solutions that meet the criteria described in the law.  More precisely, the associated regulation provided by the Department of Health and Human Services describes the set of standards,  implementation, specifications and certification for Electronic Health Record (EHR) technology.


      As a Software Architect, I was curious to see whether Service Oriented Architecture (SOA) or Web Services in general were mentioned in these documents.

      The definition of an EHR Module includes an open list of services such as electronic health information exchange, clinical decision support, public health and health authorities information queries, quality measure reporting etc.

      In the transport standards section, both SOAP and RESTful Web services protocols are described. However Service Oriented Architecture (SOA) is never explicitly described or cited. No reference how these services might be discovered and orchestrated in a "meaningful way". I would assume that the reason is that the law makers and regulators wanted to be as vague as possible on the underlying technologies for an EHR and its components.

      The technical aspect of "meaningful use" is specified more precisely when associated with interoperability, functionality, utility, data confidentiality and integrity of the data, security of the health information system in general.

      These characteristics are not necessarily specific to SOA, but to any good health care software and solution design.

      Still, the following paragraph seems to describe a solution that could be best implemented using a Service Oriented Architecture: "As another example, a subscription to an application service provider (ASP) for electronic prescribing could be an EHR Module"  where software is offered as a service (SaaS).  This looks more like the description of an emerging SOA rather than a full grid enabled SOA.

      It will be up to the solutions providers to come up with relevant products and tools to maximize the return on investment (ROI) of the tax payer's money and the professionals and organizations eligible for ARRA/HITECH.

      SOA will definitively be part of the mix since it gives the ability create, offer and maintain large numbers of complex EHR Software solutions (SaaS) that have a high level of modularization and interoperability.
       
      Further developments toward a complete SOA stack such as offering a Platform as a Service (PaaS) and even the underlying Infrastructure as a Service (IaaS) in the cloud will face more resistance in a domain known for a lot of legacy systems and concerns about privacy and security.

      The Object Management Group (OMG) is organizing a conference this summer on the topic of  "SOA in Healthcare: Improving Health through Technology: The role of SOA on the path to meaningful use". It will be interesting to see what healthcare providers, payers, public health organizations and solution providers from both the public and private sector will have to say on this topic.

      Wednesday, March 31, 2010

      Cloud Computing and Health Care Applications: a change in opinions?

      I have designed and implemented Health Care Applications for more than 3 years and I have experienced a dramatic change of opinions toward the use of Cloud Computing for Health IT.

      Several years ago, the idea of having on demand resources offered as a service, used to process or store Health Care related data, was out of the question.  The main concerns were the security, privacy and confidentiality of the data; the reliability and ease of use of the underlying systems and platforms.

      Health Care solution providers did not hesitate to require a minimum of tens of thousands of dollars of hardware to deploy a minimum configuration for a multi-tier EHR or PHR web based application. In fact, some players were even barely starting to virtualize their platforms.

      One of the requirement to comply with the Health Insurance Portability and Accountability Act of 1996 (HIPAA) regulation is that the transmission of patients protected health information (PHI) over open networks must be encrypted.

      These issues have been recently addressed and companies offering virtual infrastructure as a service such as Amazon EC2 offer 256 bit AES encryption algorithms for files containing PHI, as well as token or key-based authentication and sophisticated firewall configurations for their virtual servers. Encryption is also available when storing the data on Amazon S3. The access from the internet or EC2 to Amazon S3 is done via encrypted SSL endpoints which ensures that PHI information stays protected. AWS indeed describes several Cloud based Healthcare related applications in their case study, including MedCommons (a health records services provider that give the ability to the end users to store among other medical information CCR and DICOM documents).

      Cloud infrastructure providers such as Amazon Web Services (AWS) ensure that their administrators or third-party partners cannot have access to the underlying PHI data. Strong security policies, access consent processes, as well as monitoring and audit capabilities are available to reduce dramatically the risks of  unauthorized access. In addition to this, these providers offer highly available solutions for automated back-ups and disaster recovery which make them more attractive that traditional solutions. Some providers also ensure that the data in question stay within the borders of specific regions, states or countries to comply with regulations in place.

      In fact it is very interesting to see these days Health Care becoming a show case of the benefits of Cloud computing. Last month, at the San Francisco Bay Area ACM chapter presentation on cloud computing, I was surprised to see that the first Cloud Application example mentioned was TC3. The numbers were indeed very convincing: When facing with  sudden increase of insurance claims processing (from 1 to 100 millions per day in a very short time), TC3 had the option of a traditional solution consisting of $750K of new hardware and $30K of maintenance and hosting per month, or use an Amazon Web Service Cloud solution for $600 per month. The decision was easy I suppose!