Friday, September 25, 2015

jBPM and BPMN 2.0 workflow creation


In my previous post I was describing how to install and run jBPM console.

In this one post, I would like to describe how quickly create a workflow calling a web service.
I will be using a public weather web service based API (OpenWeatherMap) for convenience.

With this restful based API, I can easily query the current weather in a city or a zip code area:

   http://api.openweathermap.org/data/2.5/weather?q=Paris

   http://api.openweathermap.org/data/2.5/weather?zip=94404,us

I will now start by creating a new project called Meteo via the jBPM KIE console:


This will create a project where you will be able to add business processes and task forms.

Next, I am creating a business process called ObtainWeatherForecast to enter a city or zip code, call the web service and display the corresponding weather forecast:


Automatically, the Process Modelling / Shape Repository panel opens with an initial default Start Event generated.

Two side panes are quite useful to add:

  • On the left the Object library. 
  • On the right side, the Properties of the BPMN diagram elements.You click on the top buttons to show the panes.


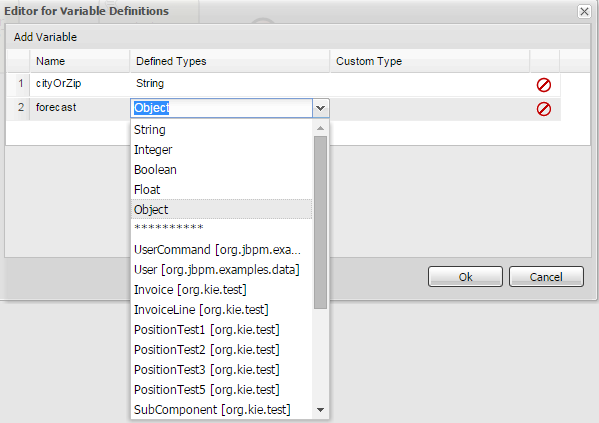
First I am going to define a set of variables that will be available in the process to maintain internal values so I can share information between nodes.
For this I click on the background of the business process and edit the Variable Definitions Properties of the ObtainWeatherForecast business process.


In the Process Modelling panel, when you select a node (event or task), you can select some very useful context icons
such as View the BPMN Node Source, create a new task or event, link nodes etc ...


When adding a new task, you have various ways to do this.

If the task is one of the 8 basic Tasks (User, Send, Receive, Manual, Service, Business Rule, Script, None),
then you can either click on the task context icon to create the next task node (as a generic/none type)
from an existing event node or a task node (1a) and specify one of the other 7 basic type if needed using the tool context icon for a more specific one (1b).


You can also use the Object library and drag/drop the task (2) and link the nodes via the link context icon (3).

If you want to add a more specific Service Task (Email, Log, REST, WS), then you can use the Object Library and select the corresponding Service Task (4).


The REST Service task has its Data Input (info associated to RESTful call) and Data Output (result from the call) properties already populated:


For the Data Assignment variables, we are going to set the Method to GET and for a quick hard-coded test,
we are going to set the url to http://api.openweathermap.org/data/2.5/weather?q=Paris
Then we are going to map the object Result of the call (use [Output Mapping]) to our process variable forecast.
Later we will be able to use the forecast JSON output and extract and display the associated information.


At this point you can add another Script Task for displaying the weather forecast result and complete the business process workflow
with a Terminate End Event, link all nodes and add useful properties such as names.


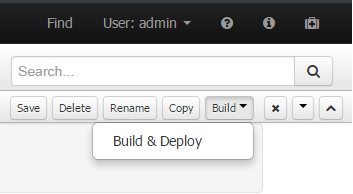
To deploy your Project and Business Process, select Build & Deploy.


After your project is successfully deployed, you select Deploy|Process Deployments.


You can then see your deployed project with the option to Deactivate it or Undeploy it.


Now you can check the Process Definitions and start ObtainWeatherForecast business process by clicking on the Start button:


After execution of the process, if you look at your Process Variables as part of the process definition, you can obtain the current weather in Paris (JSON returned object):


{"coord":{"lon":2.35,"lat":48.85},"weather":[{"id":803,"main":"Clouds","description":"broken clouds","icon":"04n"}],"base":"cmc stations","main":{"temp":287.89,"pressure":1024,"humidity":67,"temp_min":286.15,"temp_max":289.26},"wind":{"speed":2.6,"deg":20},"clouds":{"all":75},"dt":1443208502,"sys":{"type":1,"id":5615,"message":0.0054,"country":"FR","sunrise":1443159717,"sunset":1443202883},"id":2988507,"name":"Paris","cod":200}


One last tip on this first hands-on experience. If your Project Explorer goes away for some reasons (it seems there is a bug in 6.2.0 final related to this). Try to click on the reset perspective button:


Friday, August 7, 2015

First Steps with jBPM and BPMN 2.0 Modelization Tools


In this post, I would like to share my initial experience with jBPM and BPMN 2.0 modelization tools in general. jBPM is an open-source workflow engine written in Java that can execute business processes described in BPMN 2.0.

Business Process Model and Notation (BPMN) is a graphical representation for specifying business processes in a business process model. As an architect, I have been using BPMN as a language for business process modeling (e.g. for the functional breakdown of complex processing pipelines for genomics systems).

They are different ways to install jBPM. The quickest installations options include:
  1. downloading a zip file and install it on a PC or
  2. downloading and using a docker image (particularly suitable for Mac OS)
In this post, I will describe option #1 (basic zip based install). In this case, what you obtain is a zip file - e.g. jbpm-6.2.0.Final-installer-full.zip - latest version as of 8/7/2015.

  • First make sure you have installed Apache Ant and it is on your Windows Path.
  • To install type the following command at the prompt in the jbpm-installer folder:
    • $ ant install.demo

After few minutes, all dependencies are fully downloaded and jBPM is installed.


     You are now ready to start the web-based Knowledge Is Everything KIE workbench (there is also an Eclipse IDE plugin available with the download that you can use).
  • $ ant start.demo
  • Alternatively you can also download and start the demo without eclipse
    • $ ant install.demo.noeclipse
    • $ ant start.demo.noeclipse

    Issues deploying jbpm-console.war
  • if jbpm-console.war cannot be deployed in JBoss wildfly application server (former JBoss AS).
  • see folder: ...\jBPM\jbpm-installer\wildfly-8.1.0.Final\standalone\deployments 
  • and check log file: ...\jBPM\jbpm-installer\wildfly-8.1.0.Final\standalone\log\server.log
  • You might have encounter an issue with your proxy!!!
  • There are several ways to fix this, including 
    • installing KIE outside your firewall/proxy server influence (not from our office!)
    • modify your file ...\jBPM\jbpm-installer\build.xml file:
                 <exec executable="${jboss.full.path.win}" spawn="yes" osfamily="windows">
                      <env key="JAVA_OPTS" value="-XX:MaxPermSize=256m -Xms256m -Xmx512m" />
                      <arg value="-b" />
                      <arg value="${jboss.bind.address}" />
                      <arg value="--server-config=standalone-full.xml" />
                      <arg value="-Dorg.kie.demo=true" />
                      <arg value="-Dorg.kie.example=false" />
                      <arg value="-Dhttp.proxyHost=...." />
                      <arg value="-Dhttp.proxyPort=8999" />
                      <arg value="c standalone-full.xml"/>

     Using KIE
  •  If successfully deployed, go to your browser (use Chrome for better experience!) and enter
    • http://localhost:8080/jbpm-console/kie-wb.html
       
     You should have access to the jBPM KIE console (see also video demo here and look at jBPM6 Developer Guide).


      The default user name and password are 'admin'.


To have access to the business process demos click Authoring/Project and choose async-examples.

Then Business Processes/check weather (one of the demos - this one is very simple and fun!).


 This displays a very simple business process where the user can enter a zip code and obtain the weather forecast associated to the zip code in question:


Open the properties pane  if not displayed by clicking the double arrow on the top right side of the application.

You can initially do a copy of the demo in case you want to make some modifications to the demo process. You will need to modify the ID and the Version of the business process and save a copy.


Enter a new name and optionally some comments for the new version of the process:


    The copy should now appear in the list of business processes:


Deployment of a Process is done by opening the Project and select Build/Build & Deploy:


 To run the demo process, select Process Management/Process Definitions then select your process and click on the start Action icon:


  Enter the user name ('admin') and a US zip code - Here I am using 94036 (Palo Alto, CA).


Thursday, April 2, 2015

Migrating Healthcare Applications to the Cloud through Containerization and Service Brokering


Organizations that are building their own cloud infrastructure from scratch or rely uniquely only on an infrastructure as a service (IaaS) from a provider, risk spending valuable resources and time building a specialized platform instead of focusing on their core business. On the other hand, organizations who adopt a turnkey proprietary cloud stack will lack flexibility and may end up locked into a specific technology or vendor.

Instead of designing the cloud architecture from the bottom up or the top down, a better strategy is to design from the inside out. By starting with the platform as a service (PaaS) as the central critical layer and creating ways to use various IaaS models and offerings in generic ways, it is possible to create a flexible and efficient lifecycle for the services and applications running on the platform.


In Healthcare, PaaS technology such as the one offered by Pivotal Cloud Foundry facilitates the rapid creation and migration of existing applications towards better user engagement, increasing collaboration between care givers and improving the lives of patients, while reducing the total cost of ownership (TCO).


The main characteristics of this platform are:
  • Application containerization
  • Optimized application scaling
  • Application to service brokering
  • Abstraction of IaaS
  • Excellent application lifecycle management
  • Automatic middleware stack and operating system configuration
  • Advanced application monitoring

In this architecture, backing services (e.g., databases, caching systems, other data services (e.g., Amazon S3), messaging/queueing systems, SMTP services, various external APIs (Google Maps, terminology services, healthcare registry services) are just attached resources. For example, there is a distinction between a local digital imaging and communications in medicine (DICOM) local image store and a remote, 3rd party DICOM picture archiving and communication system (PACS) service hosted in the cloud.

The type of platform is especially suitable managing micro services, which allows better componentization, development and testing processes, decentralized governance, resilience and maintainability. These services, especially when they are based on a RESTful architecture, are extremely easy to build, integrate, test, extend, and maintain, and are extremely adapted for mobile applications integration.


Good and efficient lifecycle management is important to produce and maintain high quality software. This is particularly important in healthcare where the patient life is at risk or a breach of privacy could occur as a result of poor quality software.

The advantage of abstracting the IaaS layer access through a common API is that there no need to have multiple versions of application code for each deployment model. The same code will work and be monitored the same way for all cloud deployment models, including on premise and hybrid.


On top of the generic open PaaS infrastructure, we are adding generic and cross-cutting capabilities not part of the original platform including:
  • Identity management to allow customers, patients and consumers to be accurately and uniquely recognized by using an enterprise master patient index (eMPI) for patients and a lightweight directory access protocol (LDAP) based directory for healthcare providers and consumers.
  • Security/Identity Access Management: authentication, authorization, and single sign-on, all critical to secure provider, patient, and consumer applications and in certain cases, can be addressed by declarative proxification of these services.
  • Cloud-based, connected device management: device registration, discovery, routing, diagnostics, remote control, firmware provisioning, data collection, device-app-user pairing (we are currently supporting 6 million active consumer devices).
  • Open cloud based clinical workflow collaboration capabilities.
  • Secure cloud-based big data store and analytics capability (e.g., to store patient’s observations and genomic data.


We are also creating and exposing healthcare and wellness related services that applications can consume:

Our HealthSuite Digital platform also offers high availability, scalability, privacy and security compliance with regulations (e.g., HIPAA, HITECH) and standards (e.g., NIST SP800-53, ISO 27001) using multitenancy, redundancy, 24/7 monitoring and operations, and disaster recovery.


   More on:  F. Andry, R. Ridolfo, J. Huffman, Migrating Healthcare Applications to the Cloud through Containerization and Service Brokering, 8th International Conference on Health Informatics (HealthINF 2015), pp. 164-171, Lisbon, Portugal, January 2015.