Showing posts with label liferay. Show all posts

Wednesday, November 19, 2008

Flex z-index and Liferay Portal

We recently encountered an issue when embedding Flex/Flash applications in Liferay Portlets.

The shockwave (.swf) file was showing on top of the liferay navigation menu:


The usual solution is to specify the z-index for the div layers.
There are even some very cool things you can do with Flex overlay.

Liferay however is a third party portal platform and if you don't want to have to change the source code or extend Liferay, a quick fix is to use the wmode argument for the embedded flex application:

<div>
   <embed wmode="transparent" src="<%= request.getContextPath() %>/flex/clinical_data.swf" height=250 width=500>
</div>

You just have to redeploy your portlet and now the menu appears on top of your portlet:

Thursday, November 13, 2008

Liferay Portlet using BlazeDS

In my previous post, I explained why and how I used BlazeDS, a server-based Java remoting and web messaging technology, to call remote Web Services easily from Adobe Flex applications.

In this post I explain how to create a Liferay portlet that uses Flex and BlazeDS.

Creating the Liferay Portlet

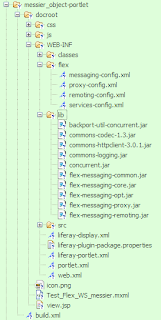
Creating a new portlet is straightforward. Under ./liferay-plugins-sdk-5.1.1/portlets at the prompt I just typed the command: create messier_object "Messier Object WS". As a result, a messier_object-portlet folder is created with the skeleton of a working portlet (the first argument of create is the name of the portlet (always postfixed with '-portlet'), the second argument is the title of the portlet).

I then modified the category name of messier_object-portlet/docroot/WEB-INF/liferay-display.xml to ICW.Test.

<display>
   <category name="ICW.Test">
      <portlet id="messier_object">
   </portlet>
</category>

I then added the Flex code by copying my testing Flex Application Test_Flex_WS_messier.mxml under the docroot folder.

Integrating the target shockwave file in the view.jsp file is also straightforward:
<div>
   <embed src="<%= request.getContextPath() %>/Test_Flex_WS_messier.swf" heigth=350 width=350>
</div>
Adding BlazeDS Libraries and Configuration Files

I then added a set of 10 jar files (backport-util-concurrent.jar to flex-messaging-remoting.jar) that came with the turnkey BlazeDS installation sample code inside the WEB-INF/lib folder.

In addition to this, I had to copy the four BlazeDS configuration files:
messaging-config.xml, proxy-config.xml, remoting-config.xml, services-config.xml.

The services defined in these files are generic and can be reuse if you want to access remote data either through Messaging, HTTService, WebService or RPC/AMF remote procedure calls.

Only proxy-config.xml contains a specific web service destination (ws-sesame) to access astronomical data for the application.


Content of messaging-config.xml:

<?xml version="1.0" encoding="UTF-8"?>
<service id="message-service" class="flex.messaging.services.MessageService">
<adapters>
<adapter-definition id="actionscript" class="flex.messaging.services.messaging.adapters.ActionScriptAdapter" default="true" />
<adapter-definition id="jms" class="flex.messaging.services.messaging.adapters.JMSAdapter"/>
</adapters>
<default-channels>
  <channel ref="my-streaming-amf"/>
  <channel ref="my-polling-amf"/>
</default-channels>
</service>

Content of proxy-config.xml:

<?xml version="1.0" encoding="UTF-8"?>
<service id="proxy-service" class="flex.messaging.services.HTTPProxyService">

<properties>
<connection-manager>
<max-total-connections>100</max-total-connections>
<default-max-connections-per-host>2</default-max-connections-per-host>
</connection-manager>
<allow-lax-ssl>true</allow-lax-ssl>
</properties>

<default-channels>
<channel ref="my-http"/>
<channel ref="my-amf"/>
</default-channels>

<adapters>
<adapter-definition id="http-proxy" class="flex.messaging.services.http.HTTPProxyAdapter" default="true"/>
<adapter-definition id="soap-proxy" class="flex.messaging.services.http.SOAPProxyAdapter"/>
</adapters>

<destination id="DefaultHTTP">
<properties>
</properties>
</destination>

<destination id="ws-sesame">
<properties>
<wsdl>http://cdsws.u-strasbg.fr/axis/services/Sesame?wsdl</wsdl>
<soap>*</soap>
</properties>
<adapter ref="soap-proxy"/>
</destination>

</service>


Content of remoting-config.xml:


<?xml version="1.0" encoding="UTF-8"?>
<service id="remoting-service" class="flex.messaging.services.RemotingService">
<adapters>
<adapter-definition id="java-object" class="flex.messaging.services.remoting.adapters.JavaAdapter" default="true"/>
</adapters>
<default-channels>
<channel ref="my-amf"/>
</default-channels>
</service>

Content of services-config.xml:


<?xml version="1.0" encoding="UTF-8"?>
<services-config>

<services>
  <service-include file-path="remoting-config.xml" />
  <service-include file-path="proxy-config.xml" />
  <service-include file-path="messaging-config.xml" />
  <default-channels>
     <channel ref="my-amf"/>
  </default-channels>
 </services>

<channels>

  <channel-definition id="my-streaming-amf" class="mx.messaging.channels.StreamingAMFChannel">
      <endpoint url="http://{server.name}:{server.port}/{context.root}/messagebroker/streamingamf" class="flex.messaging.endpoints.StreamingAMFEndpoint"/>
  </channel-definition>

  <channel-definition id="my-amf" class="mx.messaging.channels.AMFChannel">
      <endpoint url="http://{server.name}:{server.port}/{context.root}/messagebroker/amf" class="flex.messaging.endpoints.AMFEndpoint"/>
      <properties>
          <polling-enabled>false</polling-enabled>
      </properties>
  </channel-definition>

  <channel-definition id="my-secure-amf" class="mx.messaging.channels.SecureAMFChannel">
      <endpoint url="https://{server.name}:{server.port}/{context.root}/messagebroker/amfsecure" class="flex.messaging.endpoints.SecureAMFEndpoint"/>
  </channel-definition>

  <channel-definition id="my-polling-amf" class="mx.messaging.channels.AMFChannel">
      <endpoint url="http://{server.name}:{server.port}/{context.root}/messagebroker/amfpolling" class="flex.messaging.endpoints.AMFEndpoint"/>
      <properties>
          <polling-enabled>true</polling-enabled>
          <polling-interval-seconds>4</polling-interval-seconds>
      </properties>
  </channel-definition>

  <channel-definition id="my-http" class="mx.messaging.channels.HTTPChannel">
      <endpoint url="http://{server.name}:{server.port}/{context.root}/messagebroker/http" class="flex.messaging.endpoints.HTTPEndpoint"/>
  </channel-definition>

  <channel-definition id="my-secure-http" class="mx.messaging.channels.SecureHTTPChannel">
      <endpoint url="https://{server.name}:{server.port}/{context.root}/messagebroker/httpsecure" class="flex.messaging.endpoints.SecureHTTPEndpoint"/>
  </channel-definition>

</channels>

<logging>
  <!-- You may also use flex.messaging.log.ServletLogTarget -->
  <target class="flex.messaging.log.ConsoleTarget" level="Error">
      <properties>
          <prefix>[BlazeDS] </prefix>
          <includeDate>false</includeDate>
          <includeTime>false</includeTime>
          <includeLevel>true</includeLevel>
          <includeCategory>false</includeCategory>
      </properties>
      <filters>
          <pattern>Endpoint.*</pattern>
          <pattern>Service.*</pattern>
          <pattern>Configuration</pattern>
      </filters>
  </target>
</logging>

<system>
  <redeploy>
      <enabled>true</enabled>
      <watch-interval>20</watch-interval>
      <watch-file>{context.root}/WEB-INF/flex/services-config.xml</watch-file>
      <watch-file>{context.root}/WEB-INF/flex/proxy-config.xml</watch-file>
      <watch-file>{context.root}/WEB-INF/flex/remoting-config.xml</watch-file>
      <watch-file>{context.root}/WEB-INF/flex/messaging-config.xml</watch-file>      
      <touch-file>{context.root}/WEB-INF/web.xml</touch-file>
  </redeploy>
</system>

</services-config>
Do not forget to copy the definitions of the listener and the MessageBroker Servlet in your web.xml file.

Compiling the Flex Application


To compile the Flex application that will be encapsulated into the portlet, you will need to specify the portlet name as context root:
mxmlc -strict=true -show-actionscript-warnings=true -use-network=true \
-services=WEB-INF/flex/services-config.xml -context-root=messier_object-portlet \
-output=./Test_Flex_WS_messier.swf ./Test_Flex_WS_messier.mxml

Deploying the Portlet


To be able to access BlazeDS from the portlet, you will also need to copy the BlazeDS war file in tomcat under .\bundles\tomcat-6.0.16\webapps.

To compile and deploy the whole portlet just type the command 'ant deploy' at the prompt in the messier_object-portlet folder.

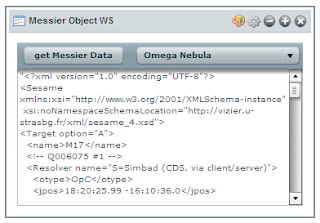
You can then add the portlet and test it:


Friday, August 29, 2008

Liferay Portal : My first impressions


My company ICW creates Health Care web applications and solutions.

We have a need to create reusable components that can be bundled into highly customizable and personalized web applications. Our stack uses Java Enterprise and Web 2.0 technologies, so we naturally turned to the open source Liferay Portal.

This was my first experience with Liferay. By looking at the features, it seems that this portal solution had a lot of things we were looking for:
  • A well recognized open source product (1.5 million downloads, 6000+ registered participants ...)
  • A business-friendly MIT License
  • Compatibility with all major servers, databases and operating systems (we are using Tomcat, Oracle, Windows for development and Linux for production).
  • Compatibility with our stack (J2E) and light container (Spring).
  • An easy way to create new skins and branding
  • An integrated content management system
  • Highly secure platform (especially important for Health Care applications)
Installing Liferay (version 5.1.0) was a little bit longer than expected (>1 GB), but after this, it went pretty smoothly besides minor MySQL configuration issues. This installation included all the source code of Liferay (I did not have to customize the code initially, but it seems nice to have all the source code available in case ...).

I did create a specific project for our need - a portal version of our Personal Health Record (PHR) - call phr-portal-assembly (see screen shot on the left):

I liked the fact that the runtime portion of the portal is contained inside the project: bundles/tomcat/ (although this takes a lot of space if you have several projects).

To be up and running, you just have to start MySQL and Tomcat and open a browser at http://localhost:8080/web/guest/home (I am using Firefox).

I find it easy to create new plugins (portlets and themes). You just have to open a prompt under the liferay-plugins-sdk-5.1.0/portlets or liferay-plugins-sdk-5.1.0/themes directory and use the command:

create new_portlet_name new_portlet_title and
create new_theme_name new_theme_title

I was then able to start to modify my portlet skeletons (by modifying the default view.JSP file under docroot) and redeploy them (without having to restart tomcat!) by using the ant deploy command. Easy and efficient!

For the themes, I was a little bit different: The style sheet changes/differences is specified under the docroot/_diffs and the new theme is built by adding the differences to the default classic look and feel.

Becoming familiar with the portal application itself was not too complicated. Especially with version 5.1.0 which can give admin rights to any type of users, so I was able to customize my portal page without having to log a as an administrator.

To make the border/chrome disappear, I just had to click on the look-and-feel icon.


This opens a new window where I had to uncheck 'Show Borders' and refresh the browser.


After this, I had to uncheck the 'Toggle Edit Controls' check box.

The resulting portal had the same look and feel as our initial PHR, but was now highly customizable.I did some also some quick tests with different layouts and themes that was provided by one of my colleague with fast and good and results. We also did some tests encapsulating an existing Flex based application and some widgets with great success.

Overall my first impression of Liferay portal is a very positive one.

I am now looking forward to tackle the re-factoring of our existing products with this technology (we are using JSF, Ajax and Flex as front-end technology)!