In my previous post, I explained why and how I used BlazeDS, a server-based Java remoting and web messaging technology, to call remote Web Services easily from Adobe Flex applications.
In this post I explain how to create a Liferay portlet that uses Flex and BlazeDS.
Creating the Liferay Portlet
Creating a new portlet is straightforward. Under ./liferay-plugins-sdk-5.1.1/portlets at the prompt I just typed the command: create messier_object "Messier Object WS". As a result, a messier_object-portlet folder is created with the skeleton of a working portlet (the first argument of create is the name of the portlet (always postfixed with '-portlet'), the second argument is the title of the portlet).
I then modified the category name of messier_object-portlet/docroot/WEB-INF/liferay-display.xml to ICW.Test.
I then added the Flex code by copying my testing Flex Application Test_Flex_WS_messier.mxml under the docroot folder.
Integrating the target shockwave file in the view.jsp file is also straightforward:
I then added a set of 10 jar files (backport-util-concurrent.jar to flex-messaging-remoting.jar) that came with the turnkey BlazeDS installation sample code inside the WEB-INF/lib folder.
 In addition to this, I had to copy the four BlazeDS configuration files:
messaging-config.xml, proxy-config.xml, remoting-config.xml, services-config.xml.
The services defined in these files are generic and can be reuse if you want to access remote data either through Messaging, HTTService, WebService or RPC/AMF remote procedure calls.
Only proxy-config.xml contains a specific web service destination (ws-sesame) to access astronomical data for the application.
Content of messaging-config.xml:
Content of proxy-config.xml:
Content of remoting-config.xml:
Content of services-config.xml:
Compiling the Flex Application
To compile the Flex application that will be encapsulated into the portlet, you will need to specify the portlet name as context root:
Deploying the Portlet
To be able to access BlazeDS from the portlet, you will also need to copy the BlazeDS war file in tomcat under .\bundles\tomcat-6.0.16\webapps.
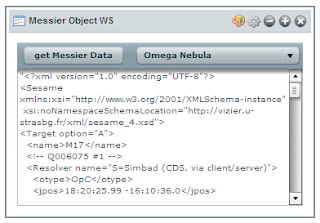
To compile and deploy the whole portlet just type the command 'ant deploy' at the prompt in the messier_object-portlet folder.
You can then add the portlet and test it:

In this post I explain how to create a Liferay portlet that uses Flex and BlazeDS.
Creating the Liferay Portlet
Creating a new portlet is straightforward. Under ./liferay-plugins-sdk-5.1.1/portlets at the prompt I just typed the command: create messier_object "Messier Object WS". As a result, a messier_object-portlet folder is created with the skeleton of a working portlet (the first argument of create is the name of the portlet (always postfixed with '-portlet'), the second argument is the title of the portlet).
I then modified the category name of messier_object-portlet/docroot/WEB-INF/liferay-display.xml to ICW.Test.
<display>
   <category name="ICW.Test">
      <portlet id="messier_object">
   </portlet>
</category>
I then added the Flex code by copying my testing Flex Application Test_Flex_WS_messier.mxml under the docroot folder.
Integrating the target shockwave file in the view.jsp file is also straightforward:
<div>
   <embed src="<%= request.getContextPath() %>/Test_Flex_WS_messier.swf" heigth=350 width=350>
</div>
Adding BlazeDS Libraries and Configuration Files
I then added a set of 10 jar files (backport-util-concurrent.jar to flex-messaging-remoting.jar) that came with the turnkey BlazeDS installation sample code inside the WEB-INF/lib folder.
 In addition to this, I had to copy the four BlazeDS configuration files:
messaging-config.xml, proxy-config.xml, remoting-config.xml, services-config.xml.
The services defined in these files are generic and can be reuse if you want to access remote data either through Messaging, HTTService, WebService or RPC/AMF remote procedure calls.
Only proxy-config.xml contains a specific web service destination (ws-sesame) to access astronomical data for the application.
Content of messaging-config.xml:
<?xml version="1.0" encoding="UTF-8"?>
<service id="message-service" class="flex.messaging.services.MessageService">
<adapters>
<adapter-definition id="actionscript" class="flex.messaging.services.messaging.adapters.ActionScriptAdapter" default="true" />
<adapter-definition id="jms" class="flex.messaging.services.messaging.adapters.JMSAdapter"/>
</adapters>
<default-channels>
  <channel ref="my-streaming-amf"/>
  <channel ref="my-polling-amf"/>
</default-channels>
</service>
Content of proxy-config.xml:
<?xml version="1.0" encoding="UTF-8"?>
<service id="proxy-service" class="flex.messaging.services.HTTPProxyService">

<properties>
<connection-manager>
<max-total-connections>100</max-total-connections>
<default-max-connections-per-host>2</default-max-connections-per-host>
</connection-manager>
<allow-lax-ssl>true</allow-lax-ssl>
</properties>

<default-channels>
<channel ref="my-http"/>
<channel ref="my-amf"/>
</default-channels>

<adapters>
<adapter-definition id="http-proxy" class="flex.messaging.services.http.HTTPProxyAdapter" default="true"/>
<adapter-definition id="soap-proxy" class="flex.messaging.services.http.SOAPProxyAdapter"/>
</adapters>

<destination id="DefaultHTTP">
<properties>
</properties>
</destination>

<destination id="ws-sesame">
<properties>
<wsdl>http://cdsws.u-strasbg.fr/axis/services/Sesame?wsdl</wsdl>
<soap>*</soap>
</properties>
<adapter ref="soap-proxy"/>
</destination>

</service>
Content of remoting-config.xml:
<?xml version="1.0" encoding="UTF-8"?>
<service id="remoting-service" class="flex.messaging.services.RemotingService">
<adapters>
<adapter-definition id="java-object" class="flex.messaging.services.remoting.adapters.JavaAdapter" default="true"/>
</adapters>
<default-channels>
<channel ref="my-amf"/>
</default-channels>
</service>
Content of services-config.xml:
<?xml version="1.0" encoding="UTF-8"?>
<services-config>

<services>
  <service-include file-path="remoting-config.xml" />
  <service-include file-path="proxy-config.xml" />
  <service-include file-path="messaging-config.xml" />
  <default-channels>
     <channel ref="my-amf"/>
  </default-channels>
 </services>

<channels>

  <channel-definition id="my-streaming-amf" class="mx.messaging.channels.StreamingAMFChannel">
      <endpoint url="http://{server.name}:{server.port}/{context.root}/messagebroker/streamingamf" class="flex.messaging.endpoints.StreamingAMFEndpoint"/>
  </channel-definition>

  <channel-definition id="my-amf" class="mx.messaging.channels.AMFChannel">
      <endpoint url="http://{server.name}:{server.port}/{context.root}/messagebroker/amf" class="flex.messaging.endpoints.AMFEndpoint"/>
      <properties>
          <polling-enabled>false</polling-enabled>
      </properties>
  </channel-definition>

  <channel-definition id="my-secure-amf" class="mx.messaging.channels.SecureAMFChannel">
      <endpoint url="https://{server.name}:{server.port}/{context.root}/messagebroker/amfsecure" class="flex.messaging.endpoints.SecureAMFEndpoint"/>
  </channel-definition>

  <channel-definition id="my-polling-amf" class="mx.messaging.channels.AMFChannel">
      <endpoint url="http://{server.name}:{server.port}/{context.root}/messagebroker/amfpolling" class="flex.messaging.endpoints.AMFEndpoint"/>
      <properties>
          <polling-enabled>true</polling-enabled>
          <polling-interval-seconds>4</polling-interval-seconds>
      </properties>
  </channel-definition>

  <channel-definition id="my-http" class="mx.messaging.channels.HTTPChannel">
      <endpoint url="http://{server.name}:{server.port}/{context.root}/messagebroker/http" class="flex.messaging.endpoints.HTTPEndpoint"/>
  </channel-definition>

  <channel-definition id="my-secure-http" class="mx.messaging.channels.SecureHTTPChannel">
      <endpoint url="https://{server.name}:{server.port}/{context.root}/messagebroker/httpsecure" class="flex.messaging.endpoints.SecureHTTPEndpoint"/>
  </channel-definition>

</channels>

<logging>
  <!-- You may also use flex.messaging.log.ServletLogTarget -->
  <target class="flex.messaging.log.ConsoleTarget" level="Error">
      <properties>
          <prefix>[BlazeDS] </prefix>
          <includeDate>false</includeDate>
          <includeTime>false</includeTime>
          <includeLevel>true</includeLevel>
          <includeCategory>false</includeCategory>
      </properties>
      <filters>
          <pattern>Endpoint.*</pattern>
          <pattern>Service.*</pattern>
          <pattern>Configuration</pattern>
      </filters>
  </target>
</logging>

<system>
  <redeploy>
      <enabled>true</enabled>
      <watch-interval>20</watch-interval>
      <watch-file>{context.root}/WEB-INF/flex/services-config.xml</watch-file>
      <watch-file>{context.root}/WEB-INF/flex/proxy-config.xml</watch-file>
      <watch-file>{context.root}/WEB-INF/flex/remoting-config.xml</watch-file>
      <watch-file>{context.root}/WEB-INF/flex/messaging-config.xml</watch-file>
      <touch-file>{context.root}/WEB-INF/web.xml</touch-file>
  </redeploy>
</system>

</services-config>
Do not forget to copy the definitions of the listener and the MessageBroker Servlet in your web.xml file.
Compiling the Flex Application
To compile the Flex application that will be encapsulated into the portlet, you will need to specify the portlet name as context root:
mxmlc -strict=true -show-actionscript-warnings=true -use-network=true \
-services=WEB-INF/flex/services-config.xml -context-root=messier_object-portlet \
-output=./Test_Flex_WS_messier.swf ./Test_Flex_WS_messier.mxml
Deploying the Portlet
To be able to access BlazeDS from the portlet, you will also need to copy the BlazeDS war file in tomcat under .\bundles\tomcat-6.0.16\webapps.
To compile and deploy the whole portlet just type the command 'ant deploy' at the prompt in the messier_object-portlet folder.
You can then add the portlet and test it:


