Tuesday, March 31, 2009

HealthCare and the benefits of a Portal Strategy

The idea that software should be componentized (built from prefabricated components) has been proposed more that 40 years ago. However it is only recently, with the advent of Service Oriented Architecture (SOA) and Software as a Service (SaaS) that effective software componentization methods to integrate systems and develop solutions have been available.
These methods help promote code reuse, low-cost system development, contribute to software quality and to more flexible IT infrastructures.

Software componentization can help software companies acquire and maintain a competitive advantage by developing, deploying and maintaining services and solutions faster, cheaper and better than their competitors. Using Web and Mobile based Graphic User Interface (GUI) components is the most common way for users to interact with IT systems.

The ability to create customizable and reusable front-end software components is especially valuable for software companies and their partners. Combined with cost effective deployment solutions such as Cloud Computing, new services can quickly be bundled, offered and tuned for specific targeted sets of customers and later rolled-out to new markets very easily.

Componentization can also help to rapidly make custom changes (such as re-branding or re-skinning) since the presentation layer is isolated from the service layer. Aggregated in web portals, front-end components can be layered on top of existing data structures, enterprise and legacy systems as well as third party services.

In healthcare for example, portals can offer a unified and personalized view for healthcare professionals, and provide real-time access to a selected patient's clinical information. The same portal infrastructure can be also customized for the patients and their care givers.

Portal technology provides ways to integrate information, people and processes across organizational boundaries. It provides a secure unified access point (SSO), often in the form of a web-based user interface, and is designed to aggregate and personalize information through application-specific component or portlets.

Another characteristic of the portal technology is the fact that content management can be decentralized allowing richer content and more efficient update of the data and information presented to the users.

A portal approach brings benefits to your customers/end-users (healthcare professionals and patients), your development, professional service and IT teams, but also your partners!
  • benefits for your end-users: Portal solutions also offer rich user experience by leveraging Web 2.0 technologies and specific components (e.g. wikis, blogs, message boards, widgets, social networking, maps, SSO, etc). Portal customization and personalization also offers to the end-users a more personalized experience based on their profiles such as their role in the organization or user group and preferences (e.g. choice of layout and look and feel).
  • benefits for your development team: This includes a common architecture for the aggregation of heterogeneous components and services, a clear separation between the presentation layer and the service layer, and the fact that portlets are based on standard technologies (e.g. JSF, Spring, Spring MVC, Hibernate, JSR-168, JSR-286, WSRP 1.0/2.0, AJAX, Java EE, or even Flex).
  • benefits for your professional service and IT teams: Portal technology can save substantial costs to both the professional service team in charge of creating solutions using a portal approach including the ability to create and combine quickly customized components that are easy re-branded for various customers is clearly a good return on investment (ROI).
  • benefits for your IT department: For the IT department, in charge of deploying and maintaining services and applications, to be able to run multiple portal sites, each with a unique domain, on the same portal server reduces avoids to duplicate hardware and image instances. Portlets can be deployed at run-time (hot deployment) reducing down time for the user and facilitate the maintenance of the applications. In addition to this, specific content, branding, layout and skins can be stored and managed independently of the application in a content management system, saving costs during development, deployment and maintenance.

For the past couple of years, there has been a clear interest in the healthcare industry, not only in the US, but also in Canada and Europe to use portal frameworks as a solution to aggregate heterogeneous services and applications. There are still a lot of important and sensitive issues to address for this type of solution in the healthcare industry (security, auditing capabilities, flexibility, extensibility, maintainability, user and content management, integration, performance, scalability, availability, quality assurance, lifecycle management, maintenance and monetization).

Next week (April 4-8 2009) at HIMSS-09 in Chicago, it will be interesting to see if the trend is confirmed and how many vendors have been repackaged their solutions using portal technology.

Saturday, February 28, 2009

Liferay and Flex Ajax Bridge (FABridge)

I am using Liferay to create highly interactive and componentized web applications and solutions for the healthcare industry. Adobe Flex is one of the technology I am using the create portlets for Liferay. One challenge is the communication between portlets and between the core layer of the portlet that access services and wrapping GUI layer (JSP/HTML and Javascript).

Adobe Flex 3.0 SDK now contains the Flex Ajax Bridge (FABridge) developed by Adobe Labs.
Flex Ajax Bridge is a small library that can be help you expose an flex application (Action Script graph) to scripting by Javascript.

To show how FABridge works in Liferay. I have created very simple Flex application that show a button. I then modify the label of the button at runtime via javascript.

The code for the Flex application is very simple:
<?xml version="1.0" encoding="utf-8"?>
<mx:Application
xmlns:mx="http://www.adobe.com/2006/mxml"
xmlns:fab="bridge.*">

<fab:FABridge bridgeName="flash" id="flash" />

<mx:Button id="button" label="Original Button" width="150"/>

</mx:Application>

The Flex application needs to refer to the action script part of the FABridge library (FABridge.as).

Likewise, your Javascript will need to refer to the Javascript part of the library (FABridge.js).


The build.bat file is a simple command (mxmlc main.mxml -output main.swf) for building the SWF file. But you can also use Flex Builder for this.

Here is how the resulting SWF file looks like inside a very simple Liferay portlet:


The code for the wrapping portlet is contains inside the view.jsp file. I am using SWFObject 2.0 to integrate the SWF file.

I am also using JQuery (I have added manually JQuery 1.2.6 lib - but I assume that I could leverage JQuery that comes with Liferay) to highlight the SWF container in green if the bridge succeeds at changing the content of the button:


If there is an expection, which is the case when the portlet is added in Liferay in Internet Explorer (IE 7.0) - refreshing the page works however! ). Then the container is highlighted in red:


Here is the whole code of the JSP file:
<%@ taglib uri="http://java.sun.com/portlet" prefix="portlet" %>

<portlet:defineObjects />
<script type="text/javascript" src="<%= request.getContextPath() %>/js/swfobject.js">
swfobject.registerObject("myId", "9.0.0", "expressInstall.swf");
</script>
<script type="text/javascript" src="<%= request.getContextPath() %>/js/FABridge.js"></script>
<script type="text/javascript" src="<%=request.getContextPath()%>/js/jquery-1.2.6.js"></script>

<script type="text/javascript">

accessFlex();

function accessFlex() {

var initCallback = function() {
try {
var root = FABridge.flash.root();
root.getButton().setLabel("Modified by FABridge");
$("#swf_div").css("border","3px solid green");
}
catch(err) {
$("#swf_div").css("border","3px solid red");
}
}

FABridge.addInitializationCallback("flash",initCallback);
}

</script>


<div id="swf_div">
<object id="myId" classid="clsid:D27CDB6E-AE6D-11cf-96B8-444553540000" width="350" height="70">
<param name="movie" value="<%= request.getContextPath() %>/flex/main.swf" />
<!--[if !IE]>-->
<object type="application/x-shockwave-flash" data="<%= request.getContextPath() %>/flex/main.swf" width="350" height="70">
<!--<![endif]-->
<p>Alternative content</p>
<!--[if !IE]>-->
</object>
<!--<![endif]-->
</object>
</div>

Wednesday, January 7, 2009

Flex Web Service Introspection Wizard and BlazeDS

In my previous post, I mentioned that if you want to fully use Flex 3.0 Web Service introspection wizard, you will need to either use Adobe LifeCycle Data service, or have a cross domain file installed on the server that expose the web services you want to use.

However, if you use only BlazeDS, the web service wizard can still be useful to better understand which type of objects you obtain when calling 3rd party web services (besides looking at the wsdl file and debugging ResultEvent.result content).

In this post I will describe how to use Flex Builder 3.0 to introspect the ICW LifeSensor Web Service API. Then I will build a small Flex based portlet to display information related to a patient who has his medical information stored in the LifeSensor Personal Health Record (PHR).

A. Introspecting the Web Services

For this, you will need to know the WSDL URL of your web services.

In the case of LifeSensor, I am accessing the WSDL file over HTTPS which is protected with a login and password but you can also test the intropection wizard with free available web services available on the internet.

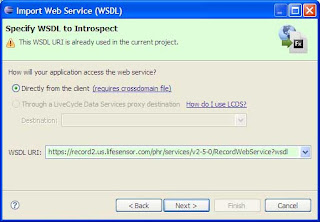
From Flex builder (I am using Flex Eclipse plugin), select "Data/Import Web Service (WSDL)...":


Then select the folder you want to import your classes to, click next, then enter the WSDL URL and click next again:


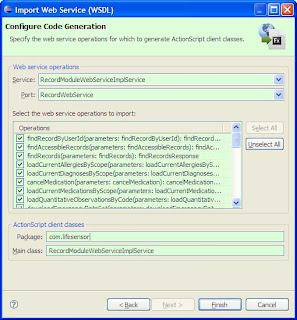
First you select the list of the operations you want to import. In my case, I just want to import the operation findAccessibleRecords.

You can also change the default value of the packages for the classes that are going to be generated and the main class name.

In my case, I just kept the default values, respectively com.lifesensor and RecordModuleWebServiceImplService.


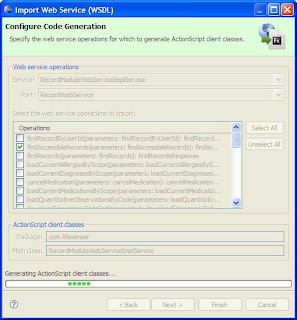
It just takes few seconds to generate the proxy classes:


Even though I am importing only one operation from LifeSensor, a little bit more than 80 classes are generated.


RecordInfoXto
and its dependent classes structure is very close to the object returned by the web service call. Therefore I will be using only the following files:
  • AddressXto.as
  • CodeSystemXto.as
  • CodeXto.as
  • DateXto.as
  • EmbeddedObjectXto.as
  • RecordInfoXto.as


/**
 * RecordInfoXto.as
 * This file was auto-generated from WSDL by the Apache Axis2 generator modified by Adobe
 * Any change made to this file will be overwritten when the code is re-generated.
 */

package com.lifesensor
{
    import mx.utils.ObjectProxy;
    import flash.utils.ByteArray;
    import mx.rpc.soap.types.*;
    /**
     * Wrapper class for a operation required type
     */
   
    public class RecordInfoXto extends com.lifesensor.EmbeddedObjectXto
    {
        /**
         * Constructor, initializes the type class
         */
        public function RecordInfoXto() {}
           
        public var academicTitle:String;
        public var address:com.lifesensor.AddressXto;
        public var birthDate:com.lifesensor.DateXto;
        public var birthPlace:String;
        public var familyName:String;
        public var gender:com.lifesensor.CodeXto;
        public var givenName:String;
        public var middleName:String;
        public var scope:String;
        public var subjectId:String;
    }
}
   public class AddressXto extends com.lifesensor.EmbeddedObjectXto {
  /**
   * Constructor, initializes the type class
   */
  public function AddressXto() {}
          
  public var city:String;
  public var corpus:String;
  public var country:com.lifesensor.CodeXto;
  public var flat:String;
  public var line1:String;
  public var line2:String;
  public var organization:String;
  public var postalCode:String;
  public var state:com.lifesensor.CodeXto;
  public var streetAddressLine:String;
  public var zipCodeExtension:String;
 }

        public class CodeXto extends com.lifesensor.CodeSystemXto
 {
  /**
   * Constructor, initializes the type class
   */
  public function CodeXto() {}
          
  public var key:String;
 }

 public class DateXto extends com.lifesensor.EmbeddedObjectXto
 {
  /**
   * Constructor, initializes the type class
   */
  public function DateXto() {}
          
  public var isoDate:String;
 }

B. Creating the Flex component using BlazeDS

In a previous post, I have described in details how to create a BlazeDS application that uses BlazeDS to access web services. This one is very similar.

The proxy-config.xml describes the web service end-points and channel:

<destination id="ws-lifesensor-record">
        <properties>
            <wsdl>https://record2.us.lifesensor.com/phr/services/v2-5-0/RecordWebService?wsdl</wsdl>
            <remote-username>????????</remote-username>
            <remote-password>????????</remote-password>
            <soap>https://record2.us.lifesensor.com/phr/services/v2-5-0/RecordWebService</soap>
        </properties>
        <adapter ref="soap-proxy"/>
    </destination>


First, I import the generated classes. Then populating the RecordInfoXto object is straightforward:
import com.lifesensor.*;

private function findAccessibleRecords_result(event:ResultEvent):void {

  if (event.result != null) {
    var all_records:ArrayCollection = event.result as ArrayCollection;
    var record:Object = all_records.getItemAt(0);
                    
    // State
    var state:CodeXto = new CodeXto();
    state.key = record.address.state.key;
                    
    // Country
    var country:CodeXto = new CodeXto();
    country.key = record.address.country.key;
                    
    // Address
    var address:AddressXto = new AddressXto();
    address.streetAddressLine = record.address.streetAddressLine;
    address.city = record.address.city;
    address.postalCode = record.address.postalCode;
    address.state = state;
    address.country = country;
                    
    // Gender
    var gender:CodeXto = new CodeXto();
    gender.key = record.gender.key;

    // Birth Date
    var date:DateXto = new DateXto();
    date.isoDate = record.birthDate.isoDate;
                    
    // Record 
    patient_record = new RecordInfoXto();
    patient_record.givenName = record.givenName;
    patient_record.familyName = record.familyName;
    patient_record.gender = gender;
    patient_record.address = address;
    patient_record.birthDate = date;
    }
}

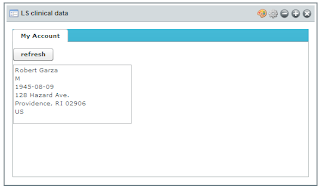
The resulting Flex based portlet is very simple (with a very compact code):

Thursday, December 18, 2008

BlazeDS and secure Web Service access

In a previous post, I described how to use Flex/BlazeDS to a access remote Web Services.
This time, I am explaining how to access a secure Web Service that requires basic authentication using the same mechanism. This involves additional changes in the configuration files.

My goal is to create flex components that access ICW Lifesensor public Web services.
The additional complication is that the access to wsdl file required authentication over HTTPS.

Fortunately, I have the login and password of a Lifesensor Account (patient), so I can use them
to access the Reporting Web Services in order to retrieve medical data entries. More information about the Lifesensor APIs and Web services are available on the ICW Developer Network.

To illustrate my point, I will use a very simple Web Service call getVersion that return some general information about the web services such as the Axis version and build date (Lifesensor uses the open source Apache Axis framework to provide Web Services).

In the wsdl file for Version, the port description shows that the getVersion operation does not have any parameter, so the call to the Web Service will be straightforward:
<wsdl:porttype name="Version">
 <wsdl:operation name="getVersion">
  <wsdl:input message="impl:getVersionRequest" name="getVersionRequest"></wsdl:input>
  <wsdl:output message="impl:getVersionResponse" name="getVersionResponse"></wsdl:output>
  </wsdl:operation>
</wsdl:porttype>

BlazeDS offers a Proxy to access remote servers. This is necessary, if you do not have a crossdomain.xml file on your remote server. As a result, there will be two hops. One from the shockwave component on the client to the Proxy, the other one from the Proxy to the remote server where the Web Services reside.

For security reasons, both bops have to be secure, as a result, the initial SWF access and loading has to be done through HTTPS. In my case, my application (and the BlazeDS proxy) is served by Tomcat 6.0 that has been configured for SSL.

The first configuration change is in the proxy-config.xml. Besides the fact that the URL is now using HTTPS protocol, you will need also to specify the soap URL instead of using a wildchard in order to avoid a RPC Fault since "a destination that allows multiple domains or ports does not allow authentication".

Also, since LifeSensor is using basic access authentication, the easiest way to avoid the pop-up window from your browser asking you for the login and password (especially for the first hop, which is not relevant), is to set them in the proxy-config.xml initially via remote-user and remote-password tags.
     <destination id="ws-lifesensor-version">
       <properties>
           <wsdl>https://record2.us.lifesensor.com/phr/services/Version?wsdl</wsdl>
           <remote-username>?????</remote-username>
           <remote-password>?????</remote-password>
           <soap>https://record2.us.lifesensor.com/phr/services/Version</soap>
       </properties>
       <adapter ref="soap-proxy"/>
   </destination>

The MXML flex file is not very different from a Web Service access with no authentication. The following code is just specific to the Lifesensor Web Service API:
<mx:Script>
     <![CDATA[
       ...
       private function getData():void { webService_LS_Version.getVersion.send();}   
       ...
    ]]>
   </mx:Script>
   <mx:WebService id="webService_LS_Version" destination="ws-lifesensor-version" useProxy="true">
       <mx:operation name="getVersion"
               resultFormat="object"
               result="getData_result(event);"
               fault="getData_fault(event);">
       </mx:operation>
   </mx:WebService>

Calling the Version Web Service from LifeSensor (via an application on https://localhost:8443/) returns the following text:
"Apache Axis version: 1.4
Built on Apr 22, 2006 (06:55:48 PDT)"

In addition to this, my recommendations will be to use Flex remote debugging and a HTTP debugging proxy such as Charles or Fiddler which can be very handy to understand and debug AMF and SOAP based HTTP wrapped requests.

Also, Flex Builder 3.0 has very nice Web Service Introspection tool. Unfortunately, you will need to have a cross domain file on the server you want to introspect or have LifeCycle Data service to use the generated proxies. Apparently, if you only use BlazeDS, there are no direct ways to use the generated code out of the box. However, you can use some of the generated classes to store some of the data you obtain from the Web Services. This will be the topic of my next post.

Wednesday, November 19, 2008

Flex z-index and Liferay Portal

We recently encountered an issue when embedding Flex/Flash applications in Liferay Portlets.

The shockwave (.swf) file was showing on top of the liferay navigation menu:


The usual solution is to specify the z-index for the div layers.
There are even some very cool things you can do with Flex overlay.

Liferay however is a third party portal platform and if you don't want to have to change the source code or extend Liferay, a quick fix is to use the wmode argument for the embedded flex application:

<div>
   <embed wmode="transparent" src="<%= request.getContextPath() %>/flex/clinical_data.swf" height=250 width=500>
</div>

You just have to redeploy your portlet and now the menu appears on top of your portlet:

Thursday, November 13, 2008

Liferay Portlet using BlazeDS

In my previous post, I explained why and how I used BlazeDS, a server-based Java remoting and web messaging technology, to call remote Web Services easily from Adobe Flex applications.

In this post I explain how to create a Liferay portlet that uses Flex and BlazeDS.

Creating the Liferay Portlet

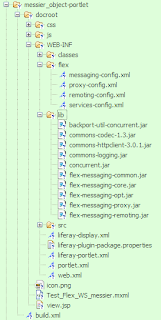
Creating a new portlet is straightforward. Under ./liferay-plugins-sdk-5.1.1/portlets at the prompt I just typed the command: create messier_object "Messier Object WS". As a result, a messier_object-portlet folder is created with the skeleton of a working portlet (the first argument of create is the name of the portlet (always postfixed with '-portlet'), the second argument is the title of the portlet).

I then modified the category name of messier_object-portlet/docroot/WEB-INF/liferay-display.xml to ICW.Test.

<display>
   <category name="ICW.Test">
      <portlet id="messier_object">
   </portlet>
</category>

I then added the Flex code by copying my testing Flex Application Test_Flex_WS_messier.mxml under the docroot folder.

Integrating the target shockwave file in the view.jsp file is also straightforward:
<div>
   <embed src="<%= request.getContextPath() %>/Test_Flex_WS_messier.swf" heigth=350 width=350>
</div>
Adding BlazeDS Libraries and Configuration Files

I then added a set of 10 jar files (backport-util-concurrent.jar to flex-messaging-remoting.jar) that came with the turnkey BlazeDS installation sample code inside the WEB-INF/lib folder.

In addition to this, I had to copy the four BlazeDS configuration files:
messaging-config.xml, proxy-config.xml, remoting-config.xml, services-config.xml.

The services defined in these files are generic and can be reuse if you want to access remote data either through Messaging, HTTService, WebService or RPC/AMF remote procedure calls.

Only proxy-config.xml contains a specific web service destination (ws-sesame) to access astronomical data for the application.


Content of messaging-config.xml:

<?xml version="1.0" encoding="UTF-8"?>
<service id="message-service" class="flex.messaging.services.MessageService">
<adapters>
<adapter-definition id="actionscript" class="flex.messaging.services.messaging.adapters.ActionScriptAdapter" default="true" />
<adapter-definition id="jms" class="flex.messaging.services.messaging.adapters.JMSAdapter"/>
</adapters>
<default-channels>
  <channel ref="my-streaming-amf"/>
  <channel ref="my-polling-amf"/>
</default-channels>
</service>

Content of proxy-config.xml:

<?xml version="1.0" encoding="UTF-8"?>
<service id="proxy-service" class="flex.messaging.services.HTTPProxyService">

<properties>
<connection-manager>
<max-total-connections>100</max-total-connections>
<default-max-connections-per-host>2</default-max-connections-per-host>
</connection-manager>
<allow-lax-ssl>true</allow-lax-ssl>
</properties>

<default-channels>
<channel ref="my-http"/>
<channel ref="my-amf"/>
</default-channels>

<adapters>
<adapter-definition id="http-proxy" class="flex.messaging.services.http.HTTPProxyAdapter" default="true"/>
<adapter-definition id="soap-proxy" class="flex.messaging.services.http.SOAPProxyAdapter"/>
</adapters>

<destination id="DefaultHTTP">
<properties>
</properties>
</destination>

<destination id="ws-sesame">
<properties>
<wsdl>http://cdsws.u-strasbg.fr/axis/services/Sesame?wsdl</wsdl>
<soap>*</soap>
</properties>
<adapter ref="soap-proxy"/>
</destination>

</service>


Content of remoting-config.xml:


<?xml version="1.0" encoding="UTF-8"?>
<service id="remoting-service" class="flex.messaging.services.RemotingService">
<adapters>
<adapter-definition id="java-object" class="flex.messaging.services.remoting.adapters.JavaAdapter" default="true"/>
</adapters>
<default-channels>
<channel ref="my-amf"/>
</default-channels>
</service>

Content of services-config.xml:


<?xml version="1.0" encoding="UTF-8"?>
<services-config>

<services>
  <service-include file-path="remoting-config.xml" />
  <service-include file-path="proxy-config.xml" />
  <service-include file-path="messaging-config.xml" />
  <default-channels>
     <channel ref="my-amf"/>
  </default-channels>
 </services>

<channels>

  <channel-definition id="my-streaming-amf" class="mx.messaging.channels.StreamingAMFChannel">
      <endpoint url="http://{server.name}:{server.port}/{context.root}/messagebroker/streamingamf" class="flex.messaging.endpoints.StreamingAMFEndpoint"/>
  </channel-definition>

  <channel-definition id="my-amf" class="mx.messaging.channels.AMFChannel">
      <endpoint url="http://{server.name}:{server.port}/{context.root}/messagebroker/amf" class="flex.messaging.endpoints.AMFEndpoint"/>
      <properties>
          <polling-enabled>false</polling-enabled>
      </properties>
  </channel-definition>

  <channel-definition id="my-secure-amf" class="mx.messaging.channels.SecureAMFChannel">
      <endpoint url="https://{server.name}:{server.port}/{context.root}/messagebroker/amfsecure" class="flex.messaging.endpoints.SecureAMFEndpoint"/>
  </channel-definition>

  <channel-definition id="my-polling-amf" class="mx.messaging.channels.AMFChannel">
      <endpoint url="http://{server.name}:{server.port}/{context.root}/messagebroker/amfpolling" class="flex.messaging.endpoints.AMFEndpoint"/>
      <properties>
          <polling-enabled>true</polling-enabled>
          <polling-interval-seconds>4</polling-interval-seconds>
      </properties>
  </channel-definition>

  <channel-definition id="my-http" class="mx.messaging.channels.HTTPChannel">
      <endpoint url="http://{server.name}:{server.port}/{context.root}/messagebroker/http" class="flex.messaging.endpoints.HTTPEndpoint"/>
  </channel-definition>

  <channel-definition id="my-secure-http" class="mx.messaging.channels.SecureHTTPChannel">
      <endpoint url="https://{server.name}:{server.port}/{context.root}/messagebroker/httpsecure" class="flex.messaging.endpoints.SecureHTTPEndpoint"/>
  </channel-definition>

</channels>

<logging>
  <!-- You may also use flex.messaging.log.ServletLogTarget -->
  <target class="flex.messaging.log.ConsoleTarget" level="Error">
      <properties>
          <prefix>[BlazeDS] </prefix>
          <includeDate>false</includeDate>
          <includeTime>false</includeTime>
          <includeLevel>true</includeLevel>
          <includeCategory>false</includeCategory>
      </properties>
      <filters>
          <pattern>Endpoint.*</pattern>
          <pattern>Service.*</pattern>
          <pattern>Configuration</pattern>
      </filters>
  </target>
</logging>

<system>
  <redeploy>
      <enabled>true</enabled>
      <watch-interval>20</watch-interval>
      <watch-file>{context.root}/WEB-INF/flex/services-config.xml</watch-file>
      <watch-file>{context.root}/WEB-INF/flex/proxy-config.xml</watch-file>
      <watch-file>{context.root}/WEB-INF/flex/remoting-config.xml</watch-file>
      <watch-file>{context.root}/WEB-INF/flex/messaging-config.xml</watch-file>      
      <touch-file>{context.root}/WEB-INF/web.xml</touch-file>
  </redeploy>
</system>

</services-config>
Do not forget to copy the definitions of the listener and the MessageBroker Servlet in your web.xml file.

Compiling the Flex Application


To compile the Flex application that will be encapsulated into the portlet, you will need to specify the portlet name as context root:
mxmlc -strict=true -show-actionscript-warnings=true -use-network=true \
-services=WEB-INF/flex/services-config.xml -context-root=messier_object-portlet \
-output=./Test_Flex_WS_messier.swf ./Test_Flex_WS_messier.mxml

Deploying the Portlet


To be able to access BlazeDS from the portlet, you will also need to copy the BlazeDS war file in tomcat under .\bundles\tomcat-6.0.16\webapps.

To compile and deploy the whole portlet just type the command 'ant deploy' at the prompt in the messier_object-portlet folder.

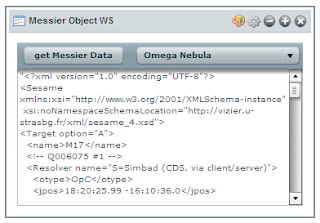
You can then add the portlet and test it:


Friday, November 7, 2008

How to use BlazeDS for Web Service access

I was recently asked to investigate how quickly aggregate medical content from various sources in a portal environment. One path I explored was to use Adobe Flex as front-end technology and access remote web services such as the ones offered by ICW LifeSensor.

With Flex 3.0 you can easily use a Web Service directly from your MXML or ActionScript code, including .NET based web services.

However there are some restrictions. For security reasons, applications running in Flash Player on client computers can only access remote data sources if one of the following conditions is met:
  • Your SWF file is in the same domain as the remote data source.
  • A cross-domain policy file is installed on the web server hosting the data source.
  • You use a proxy and your SWF file is on the same server as the proxy.
Since the Web services I want to use are not under my control and I know they do not have a cross-domain policy files installed, the only solution left is for me to use a proxy.

The good news is that BlazeDS, in addition to add RPC capabilities to Flex, acts as a Proxy, so won't have to write my own!


Installing and trying BlazeDS
BlazeDS is really easy to install. I choose to download the turnkey version to start because it includes a runtime environment (Apache Tomcat) and lot of samples.


After download and unzip, the only things I had to do was to start the database for the samples (Hypersonic/HSQLDB) and start tomcat and point to http://localhost:8400/samples/. The "Take the test drive" of the tutorial contains a section (sample 2) using web services. The sample code is accessible in .\blazeds_turnkey_3-0-0-544\tomcat\webapps\samples\testdrive-webservice\src\main.mxml:

     <mx:Application xmlns:mx="http://www.adobe.com/2006/mxml"   backgroundColor="#FFFFFF">
 
       <mx:WebService id="srv" destination="ws-catalog" useProxy="true" showBusyCursor="true"/>
 
        <mx:DataGrid dataProvider="{srv.getProducts.lastResult}" width="100%" height="100%">
          <mx:columns>
                  <mx:DataGridColumn dataField="productId" headerText="Product Id"/>
                  <mx:DataGridColumn dataField="name" headerText="Name"/>
                  <mx:DataGridColumn dataField="price" headerText="Price"/>
           </mx:columns>
       </mx:DataGrid>
 
       <mx:Button label="Get Data" click="srv.getProducts()"/>
 
   </mx:Application>
The destination of the web service is defined in .\samples\WEB-INF\flex\proxy-config.xml:

   <destination id="ws-catalog">
       <properties>
           <wsdl>http://livecycledata.org/services/ProductWS?wsdl</wsdl>
           <soap>*</soap>
       </properties>
       <adapter ref="soap-proxy"/>
   </destination>

Installing and trying BlazeDS

The next step for me was to try to build a new Flex application from scratch
that uses a web service from an outside domain.
I decided to use one of my favorite free testing Web service,
the "CDS - Centre de Données astronomiques de Strasbourg"
located in Alsace, France which provides access to Astronomical data,
including Messier Objects.

Sesame is one of the apache axis based services hosted by CDS.
In the same way, this new service is declared in the proxy-config.xml file:

      <destination id="ws-sesame">
        <properties>
            <wsdl>http://cdsws.u-strasbg.fr/axis/services/Sesame?wsdl</wsdl>
            <soap>*</soap>
        </properties>
        <adapter ref="soap-proxy"/>
    </destination>

The Flex program is very easy to construct.
I have a list of Messier Objects in a combo box with their IDs (Mxxxx)
that are passed as argument for the SesameXML web service operation (see WDSL file).
The web service call indicated that BlazeDS is used as as proxy (useProxy="true")
and define two ActionScripts methods to handle the result coming back
from the remote service and to handle any error (respectively  getData_result and getData_fault).

<?xml version="1.0" encoding="utf-8"?>
<mx:Application xmlns:mx="http://www.adobe.com/2006/mxml" layout="absolute">
    <mx:Script>
        <![CDATA[
            import mx.controls.Alert;
            import mx.rpc.events.ResultEvent;
            import mx.rpc.events.FaultEvent;
   import mx.utils.ObjectUtil;            
            // This software uses source code created at the Centre de Données astronomiques de Strasbourg, France.
            private function getData():void { webService.SesameXML.send();}
            private function getData_result(evt:ResultEvent):void {textArea.text = ObjectUtil.toString(evt.result);}
            private function getData_fault(evt:FaultEvent):void {Alert.show(evt.type);}
        ]]>
    </mx:Script>
    
    <mx:WebService id="webService" destination="ws-sesame" useProxy="true">
        <mx:operation name="SesameXML"
                resultFormat="object"
                result="getData_result(event);"
                fault="getData_fault(event);"> 
                <mx:request>
    <name>{messier_object.selectedItem.data}</name>
  </mx:request>
        </mx:operation>
    </mx:WebService>
 <mx:ApplicationControlBar dock="true">
        <mx:Button id="button" label="get Messier Data" click="getData();" />
        <mx:Spacer width="10%"/>
        <mx:ComboBox id="messier_object" width="200">
            <mx:dataProvider>
               <mx:ArrayCollection>
                  <mx:source>
                    <mx:Object label="Crab Nebula" data="M1"/>
                    <mx:Object label="Butterfly Cluster" data="M6"/>
                    <mx:Object label="Butterfly Cluster" data="M6"/>
                    <mx:Object label="Ptolemy Cluster" data="M7"/>
                    <mx:Object label="Lagoon Nebula" data="M8"/>
                    <mx:Object label="Wild Duck Cluster" data="M11"/>
                    <mx:Object label="Great Globular Cluster in Hercules" data="M13"/>
                    <mx:Object label="Eagle Nebula" data="M16"/> 
                    <mx:Object label="Omega Nebula" data="M17"/> 
                    <mx:Object label="Trifid Nebula" data="M20"/> 
                    <mx:Object label="Sagittarius Cluster" data="M22"/> 
                    <mx:Object label="Sagittarius Star Cloud" data="M24"/> 
                  </mx:source>
                </mx:ArrayCollection>
            </mx:dataProvider>
           </mx:ComboBox>
    </mx:ApplicationControlBar>
    <mx:TextArea id="textArea" editable="false" width="100%" height="100%" />
 
</mx:Application>
Building the SWF file

To build your shockwave executable file, it is important to indicate where the services
configuration file is located, so the BlazeDS stub is added to the *.SWF file
running in the browser inside the Flash Player and will make the connection
of the BlazeDS proxy.

   mxmlc -strict=true \
-show-actionscript-warnings=true \
-use-network=true \
-services=WEB-INF/flex/services-config.xml \
-context-root=samples \
-output=testdrive-webservice/main.swf testdrive-webservice/src/main.mxm
In fact, services-config.xml describes the different services that the web application is using:
 <services-config>
    <services>
        <service-include file-path="proxy-config.xml" />
        ...
   </services>
   ....
 </services-config>
You will also need to modify your ./docroot/WEB-INF/web.xml file by adding the definitions of the listener and the MessageBroker Servlet definition.
<web-app>
    <display-name>WebTest</display-name>
    <description>Application with Samples</description>

    <context-param>
        <param-name>flex.class.path</param-name>
        <param-value>/WEB-INF/flex/hotfixes</param-value>
    </context-param>

    <!-- Http Flex Session attribute and binding listener support -->
    <listener>
        <listener-class>flex.messaging.HttpFlexSession</listener-class>
    </listener>

    <!-- MessageBroker Servlet -->
    <servlet>
        <servlet-name>MessageBrokerServlet</servlet-name>
        <display-name>MessageBrokerServlet</display-name>
        <servlet-class>flex.messaging.MessageBrokerServlet</servlet-class>
        <init-param>
            <param-name>services.configuration.file</param-name>
            <param-value>/WEB-INF/flex/services-config.xml</param-value>
        </init-param>
        <load-on-startup>1</load-on-startup>
    </servlet>
    <servlet-mapping>
        <servlet-name>MessageBrokerServlet</servlet-name>
        <url-pattern>/messagebroker/*</url-pattern>
    </servlet-mapping>
 
</web-app>
Here is the result after querying information about Messier object (M1 - Crab Nebula):
The next task for me to see how to integrate BlazeDS in a portal environment
such as Liferay and explore authentication to Web Services and security features associated
to the use of BlazeDS.