Wednesday, October 9, 2024

Heraldry (1/4) : The origins


Did you know the real origin of the coat of arms? There have been a lot of misconception about it. The picture just above is the Plantagenet enamel, considered as the oldest known coat of arms.

It is in the 12th century that a new emblem appeared in Europe that profoundly transformed the symbolic uses of medieval society: the coat of arms. The coat of arms, through the code that constitutes its grammar: the blazon, has influenced our value systems linked to identity, kinship and belonging to a group or a community in general. 

So we are talking about emblems and symbols here. So what is the difference between an emblem and a symbol

An emblem is a sign that indicates the identity of an individual or a group of individuals: the name, the uniform, the iconographic attribute, and the coat of arms are emblems.

A symbol, on the other hand, has as its signifier not a physical person, but an abstract entity, an idea, a notion, a concept. Time for example, love, justice, death are symbols. Sometimes, certain figures, certain colors, certain objects are both emblems and symbols. The blue, white, red flag is both the emblem of France, but also the symbol of a certain idea of ​​the republic, democracy and freedoms.

Coats of arms are therefore emblems, even if they themselves often use symbols (for example, the use of the color red or golden yellow or an eagle or a wild animal can evoke power). The coat of arms as such symbolizes descent or a family alliance, land ownership, or even a profession.

What is the origin of heraldic art?

In the Middle Ages, a herald was a minor domestic officer in the service of a prince or nobleman whose mission was to carry messages, declare war or announce tournaments. Over time, the herald specialized in this activity, a bit like our modern sports reporters. To do this, he had to deepen his knowledge of coats of arms and the associated language to describe blazons.

But how did coats of arms and blazons initially appear? Greek vases sometimes show warriors with circular shields decorated with animal or plant figures that look a bit like coats of arms. In fact, neither the Greeks nor the Romans used coats of arms, because the same colours and figures were found from one group of individuals to another and did not sanction a particular belonging to a family, a deme or a city.

Another origin often heard is that the coat of arms comes from a Byzantine or Muslim loan following the Crusades. This is false, since the adoption of heraldic art in the countries of the Middle East is much later than its appearance in Western Europe.

The origin of coats of arms is linked to two phenomena: the transformation of feudal society around the year 1000, as well as the evolution of military equipment at that time

In the 11th century, most fighters were covered with chainmail with a hood and a nasal helmet that made them unrecognizable by friends or foes. They therefore took the habit of painting geometric, animal and floral figures on their large shields, which served as a sign of recognition in the heart of the fray. It should also be noted that shields were generally reinforced with more or less wide metal plates, and sometimes even fur in order to cushion the blows of swords, lances or axes. We will see that all this will have an effect on the design and appearance of coats of arms.

Coats of arms are therefore initially a way for a group of warriors to identify themselves as belonging to a noble family, a fief, or even a suzerain. These coats of arms will be found not only on the shields of the fighters, but also on the armor and crest of the knight, the caparison of their steed, the banners, as well as the seals that seal official documents, and finally for principalities and kingdoms: on coins.

But this is another story ...

To know more (in French): Michel Pastoureau, L'Art héraldique au Moyen Âge, Seuil, 2018.


Thursday, February 28, 2019

The French HealthCare Ecosystem in five infographics


Monday, January 28, 2019

The new National French PHR (Dossier Médical Partagé) – How does it work? - Part 2


In my preview post, I was describing how to create a record into the new National French PHR (Dossier Médical Partagé).
In this article, I will explore the content of the DMP and discuss the potential challenges of adding new data to it.

First I log with my credentials (login and password) and provide a 2 factor authentication 6 digits number sent to me either by email of SMS.

My DMP contains several tabs:
  • RÉCAPITULATIF (summary)
  • DOCUMENTS (documents)
  • MES INFORMATIONS (my informations)
  • GESTION DU DMP (record management)
  • HISTORIQUE DES ACCÈS (Access log)


Let's start by trying to add manually a document. For this, I have two options:
  • Typing a document
  • Adding a file


Writing a document:


Adding a file:


Coming back to the main documents tab, we can see that it can potentially contain various types of healthcare related documents:


  • Synthèses (syntheses)


  • Traitements et soins (treatments and care)


  • Compte-rendus (reports) 


  • Imagerie médicale (medical imagerie) 


  • Biologie (biology / Lab results) 


  • Prévention (prevention)


  • This page has a search section:


    The document section itself can be expanded according to very precise documents sub-types:
    • Synthèses (syntheses)
      • Synthèse (synthesis)
      • Synthèse d'épisode de soins (summary episode of care)
    • Traitements et soins (treatments and care)
      • CR ou fiche de suivi de soins par auxiliaire médical (report or medical assistant care follow-up card)
      • Dispensation médicamenteuse (Drug dispensing)
      • Dispensation autre (Dispensation other)
      • Plan personnalisé de soins (Personalized care plan) 
      • Prescription de médicaments (Prescription of drugs) 
      • Prescription de soins (Prescription of care) 
      • Prescription autre (Prescription other) 
      • Protocole de soins affection longue durée (ALD) (Long-term care protocol)
    • Comptes-rendus (reports)
      • CR d'accouchement (delivery report)
      • CR d'acte diagnostique (diagnostic act report)
      • CR d'acte thérapeutique (therapeutic act report)
      • CR d'admission (admission report)
      • CR d'anesthésie (reports of anesthesia)
      • CR de bilan d'évaluation de la perte d'autonomie (assessment report reports of loss of autonomy)
      • CR de bilan fonctionnel par auxiliaire médical (reports of functional assessment by medical auxiliary)
      • CR de consultation pré-anesthésique (pre-anesthetic consultation report)
      • CR de passage aux urgences (emergency room report)
      • CR de réunion de concertation pluridisciplinaire (tumor board report)
      • CR de télé-médecine (telemedicine report)
      • CR séjour hospitalier (report of hospital stay)
      • CR opératoire (surgery report)
      • CR ou fiche de consultation ou de visite (visit report)
      • Lettre de liaison à la sortie d'un établissement de soins (Liaison letter exit of a care facility)
    • Imagerie médicale (medical imaging)
      • CR d'imagerie médicale (medical imaging report)
      • Document encapsulant une image d'illustration non DICOM (document including a non-DICOM image)
    • Biologie (biology)
      •   CR d'anatomie et de cytologie pathologiques (anatomy and pathological cytology report)
      •   CR d'examens biologiques (biological examination report)
    • Prévention (Prevention)
      •   CR d'acte diagnostique à visée préventive ou de dépistage (report of diagnostic act)
      •   CR d'acte thérapeutique à visée préventive (Preventive action report)
    Now lets looks at the type of data I have in my record. These have been pushed into my DMP by the French national health insurance (Caisse d'Assurance maladie) accessible via my account AMELI (Assurance Maladie En LIgne). Each patient in France has one unique INSEE number used for healthcare tracking (children use their parents accounts) and other administrative purpose. Supplemental coverage is also usually provided by private mutual insurers. 

    So far it is not clear to me whether they provide any additional information to my record.

    A warning indicates that the displayed data is a reflection of information from reimbursement or support held by health insurance organizations mandatory for the last 24 months. They are provided for information purposes only and exhaustiveness can not be guaranteed, especially in the event of an administrative change during these 24 months.

    There are 5 possible sections (In my case the section hospitalization is empty).
    • Pharmacie / fournitures (Pharmacy and various supplies - e.g. optician / glasses)
    • Hospitalisation (Hospitalization)
    • Soins médicaux et dentaires (Medical and dental care)
    • Radiologie (Radiology)
    • Biologie (Biology)
    Here is how these sections look like (data has been modified/changed for obvious privacy concern). 

    Let's start with the Pharmacy and Medical Supplies section:


    The section Medical and Dental Care includes medical care including PCP, physiotherapist, nurse, dentist, dermatologistophthalmologist visits:


    The section Radiology includes body and dental scans:


    La section Biology includes Labs data (only dates, coding act and types, not the results themselves):


    To sum-up my data is well organized and easy to access. However only the payer information is available (French national insurance)  which is not very different from what I could obtain directly from my AMELI account (Assurance Maladie En LIgne). There is no useful clinical information that I could share with healthcare professionals, expect perhaps if I had manually entered some of the information myself. For example, I could have added my lab results from the paper report I had received from the labs or manually added over-the-counter drugs.

    In my next post I will look at other features of my DMP such a consent, trusted people and organ donation options.


    Monday, January 14, 2019

    The new National French PHR (Dossier Médical Partagé) – How does it work? - Part 1


    Since November 2018, each French patient can have access to a new national Patient Health Record (PHR) called in French the Dossier Médical Partagé or DMP (shared medical file).

    How does it work from an end-user perspective? In this post, I describe my first experience with this new healthcare application - with all security and privacy precautions related to my protected health information (PHI).


    I have seen several large scale initiatives starting (e.g. Microsoft HealthVault, KP/MyHealth Manager) with some initiatives including GoogleHealth who was abandoned for some time and was reborn in another form  as Google Cloud for Healthcare.


    I have been working in the medical data integration and processing field for many years now and even share a patent in this domain. By experience, I know that the most difficult part is not to design and create a scalable and secure structured medical repository, but to make sure that it is supplied with up-to-date and relevant data. I have a good knowledge of HL7, IHE profiles and other data integration standards and I recognize the complexity of acquiring and reconcile medical data to be used by healthcare professionals.
       

    First, let’s start with the creation of my DMP. There are several options to create a national PHR/DMP in France. The first one is to ask a pharmacist to create it for you, the second option is to initiate the creation of the DMP yourself. This is the later I have chosen.

    From the main DMP web site creation page  https://www.dmp.fr/patient/creation/etape1, I was able to create my account in few minutes after providing a specific creation code generated by dmp.fr and my social security or INSEE number (the main personal ID for patients in France).


    I also need to add a 11 digit number that is located on my Carte Vitale, the health insurance card of the national health care system in France.


      ... some contact info (email and phone):


    and very important, consent:


    and my account is created (credentials have been modified for obvious reasons).


     Additional information is requested (e.g. address etc):


    Now that my account has been created, I am able to access it using my personal credentials:


    A two factor numeric ID is also sent to my cell phone (or email account) can be requested:


    and used for additional security:


    For the first connection, I have the option to change some of my account settings:


    and some "break-the-glass" type authorization settings:


    Overall the experience of creating my DMP/PHR account was quite easy and without any particular problem. It was fast and secure. The initial performance of the application seems good, having in mind that this is just the beginning and that only a small number of patients of the French population have a DMP account.

    In my next post, I will explore the functionalities and the type of data that could be part of a DMP.


    Friday, September 25, 2015

    jBPM and BPMN 2.0 workflow creation


    In my previous post I was describing how to install and run jBPM console.

    In this one post, I would like to describe how quickly create a workflow calling a web service.
    I will be using a public weather web service based API (OpenWeatherMap) for convenience.

    With this restful based API, I can easily query the current weather in a city or a zip code area:

       http://api.openweathermap.org/data/2.5/weather?q=Paris
    
       http://api.openweathermap.org/data/2.5/weather?zip=94404,us
    

    I will now start by creating a new project called Meteo via the jBPM KIE console:


    This will create a project where you will be able to add business processes and task forms.

    Next, I am creating a business process called ObtainWeatherForecast to enter a city or zip code, call the web service and display the corresponding weather forecast:


    Automatically, the Process Modelling / Shape Repository panel opens with an initial default Start Event generated.

    Two side panes are quite useful to add:

    • On the left the Object library. 
    • On the right side, the Properties of the BPMN diagram elements.You click on the top buttons to show the panes.


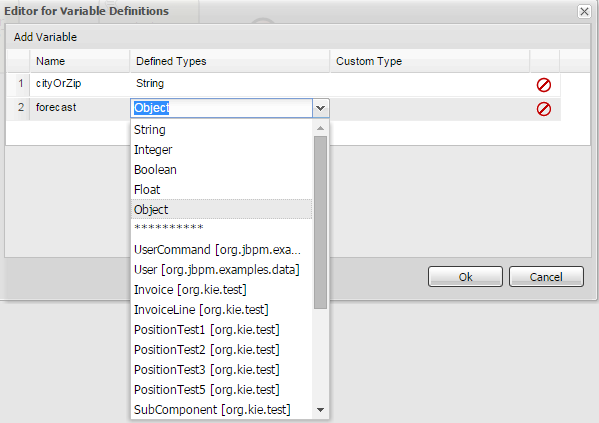
    First I am going to define a set of variables that will be available in the process to maintain internal values so I can share information between nodes.
    For this I click on the background of the business process and edit the Variable Definitions Properties of the ObtainWeatherForecast business process.


    In the Process Modelling panel, when you select a node (event or task), you can select some very useful context icons
    such as View the BPMN Node Source, create a new task or event, link nodes etc ...


    When adding a new task, you have various ways to do this.

    If the task is one of the 8 basic Tasks (User, Send, Receive, Manual, Service, Business Rule, Script, None),
    then you can either click on the task context icon to create the next task node (as a generic/none type)
    from an existing event node or a task node (1a) and specify one of the other 7 basic type if needed using the tool context icon for a more specific one (1b).


    You can also use the Object library and drag/drop the task (2) and link the nodes via the link context icon (3).

    If you want to add a more specific Service Task (Email, Log, REST, WS), then you can use the Object Library and select the corresponding Service Task (4).


    The REST Service task has its Data Input (info associated to RESTful call) and Data Output (result from the call) properties already populated:


    For the Data Assignment variables, we are going to set the Method to GET and for a quick hard-coded test,
    we are going to set the url to http://api.openweathermap.org/data/2.5/weather?q=Paris
    Then we are going to map the object Result of the call (use [Output Mapping]) to our process variable forecast.
    Later we will be able to use the forecast JSON output and extract and display the associated information.


    At this point you can add another Script Task for displaying the weather forecast result and complete the business process workflow
    with a Terminate End Event, link all nodes and add useful properties such as names.


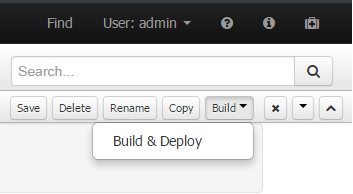
    To deploy your Project and Business Process, select Build & Deploy.


    After your project is successfully deployed, you select Deploy|Process Deployments.


    You can then see your deployed project with the option to Deactivate it or Undeploy it.


    Now you can check the Process Definitions and start ObtainWeatherForecast business process by clicking on the Start button:


    After execution of the process, if you look at your Process Variables as part of the process definition, you can obtain the current weather in Paris (JSON returned object):


    {"coord":{"lon":2.35,"lat":48.85},"weather":[{"id":803,"main":"Clouds","description":"broken clouds","icon":"04n"}],"base":"cmc stations","main":{"temp":287.89,"pressure":1024,"humidity":67,"temp_min":286.15,"temp_max":289.26},"wind":{"speed":2.6,"deg":20},"clouds":{"all":75},"dt":1443208502,"sys":{"type":1,"id":5615,"message":0.0054,"country":"FR","sunrise":1443159717,"sunset":1443202883},"id":2988507,"name":"Paris","cod":200}
    
    
    One last tip on this first hands-on experience. If your Project Explorer goes away for some reasons (it seems there is a bug in 6.2.0 final related to this). Try to click on the reset perspective button: